263 lines
9.4 KiB
Markdown
263 lines
9.4 KiB
Markdown
---
|
|
title: Comments
|
|
icon: la:comment
|
|
createTime: 2025/10/08 11:58:59
|
|
permalink: /en/guide/features/comments/
|
|
---
|
|
|
|
## Overview
|
|
|
|
Article comments are powered by [@vuepress/plugin-comment](https://ecosystem.vuejs.press/zh/plugins/blog/comment/).
|
|
|
|
The theme has built-in plugin support, so you can use it without reinstalling.
|
|
|
|
In this theme, configure through the following fields:
|
|
|
|
```ts title=".vuepress/config.ts"
|
|
import { defineUserConfig } from 'vuepress'
|
|
import { plumeTheme } from 'vuepress-theme-plume'
|
|
|
|
export default defineUserConfig({
|
|
theme: plumeTheme({
|
|
comment: {
|
|
// Service provider
|
|
provider: '', // "Artalk" | "Giscus" | "Twikoo" | "Waline"
|
|
// Whether comments are enabled by default
|
|
comment: true,
|
|
|
|
// Other configurations based on the service provider
|
|
// ...
|
|
}
|
|
})
|
|
})
|
|
```
|
|
|
|
### Service Providers
|
|
|
|
[@vuepress/plugin-comment](https://ecosystem.vuejs.press/zh/plugins/blog/comment/) supports various
|
|
comment service providers such as `"Artalk" | "Giscus" | "Twikoo" | "Waline"`.
|
|
|
|
You can configure based on your requirements.
|
|
|
|
- `Giscus` is a comment system based on GitHub Discussions, easy to set up. [View documentation](https://ecosystem.vuejs.press/zh/plugins/blog/comment/giscus/)
|
|
- `Waline` is a comment system that requires a backend, offering higher security. [View documentation](https://ecosystem.vuejs.press/zh/plugins/blog/comment/waline/)
|
|
- `Twikoo` is a concise, secure, free static website comment system based on Tencent Cloud Base. [View documentation](https://ecosystem.vuejs.press/zh/plugins/blog/comment/twikoo/)
|
|
- `Artalk` is a concise self-hosted comment system that you can easily deploy on your server and embed in frontend pages. [View documentation](https://ecosystem.vuejs.press/zh/plugins/blog/comment/artalk/)
|
|
|
|
::: tip Recommended Comment Services
|
|
|
|
- For programmers and developers: Giscus
|
|
- For the general public: Waline
|
|
:::
|
|
|
|
::: note
|
|
Examples are forked from [@vuepress/plugin-comment](https://ecosystem.vuejs.press/zh/plugins/blog/comment/),
|
|
following the [MIT](https://github.com/vuepress/ecosystem/blob/main/LICENSE) license.
|
|
:::
|
|
|
|
## Giscus
|
|
|
|
Giscus is a comment system based on GitHub Discussions, easy to set up.
|
|
|
|
### Prerequisites
|
|
|
|
::: steps
|
|
|
|
1. You need to create a public repository and enable Discussions to serve as the location for storing comments.
|
|
|
|
2. You need to install the [Giscus App](https://github.com/apps/giscus) to grant it permission to access the corresponding repository.
|
|
|
|
3. After completing the above steps, go to the [Giscus page](https://giscus.app/zh-CN) to get your settings.
|
|
|
|
You only need to fill in the repository and Discussion category, then scroll to the "Enable giscus" section
|
|
at the bottom of the page to obtain the four attributes: `data-repo`, `data-repo-id`, `data-category`, and `data-category-id`.
|
|
|
|
:::
|
|
|
|
### Configuration
|
|
|
|
Set `provider: 'Giscus'` and pass `data-repo`, `data-repo-id`, `data-category`, and `data-category-id` as
|
|
plugin options to `repo`, `repoId`, `category`, and `categoryId`.
|
|
|
|
```ts title=".vuepress/config.ts"
|
|
import { defineUserConfig } from 'vuepress'
|
|
import { plumeTheme } from 'vuepress-theme-plume'
|
|
|
|
export default defineUserConfig({
|
|
theme: plumeTheme({
|
|
comment: {
|
|
provider: 'Giscus', // "Artalk" | "Giscus" | "Twikoo" | "Waline"
|
|
comment: true,
|
|
repo: 'Your_Repo', // [!code ++]
|
|
repoId: 'Your_RepoId', // [!code ++]
|
|
category: 'Your_Category', // [!code ++]
|
|
categoryId: 'Your_CategoryId', // [!code ++]
|
|
}
|
|
})
|
|
})
|
|
```
|
|
|
|
### Themes
|
|
|
|
By default, Giscus uses `light` or `dark` themes (based on the dark mode state).
|
|
|
|
If you want to customize themes for light and dark modes, you can set the `lightTheme` and `darkTheme` options
|
|
using built-in theme keywords or custom CSS links starting with `https://`.
|
|
|
|
## Waline
|
|
|
|
A secure comment system with a backend.
|
|
|
|
### Installation
|
|
|
|
If you want to use Waline in the theme, you need to install `@waline/client` first.
|
|
|
|
::: npm-to
|
|
|
|
```sh
|
|
npm i @waline/client
|
|
```
|
|
|
|
:::
|
|
|
|
### LeanCloud Setup (Database)
|
|
|
|
::: steps
|
|
|
|
1. [Login](https://console.leancloud.app/login) or [Register](https://console.leancloud.app/register) for
|
|
`LeanCloud International` and enter the [Console](https://console.leancloud.app/apps)
|
|
|
|
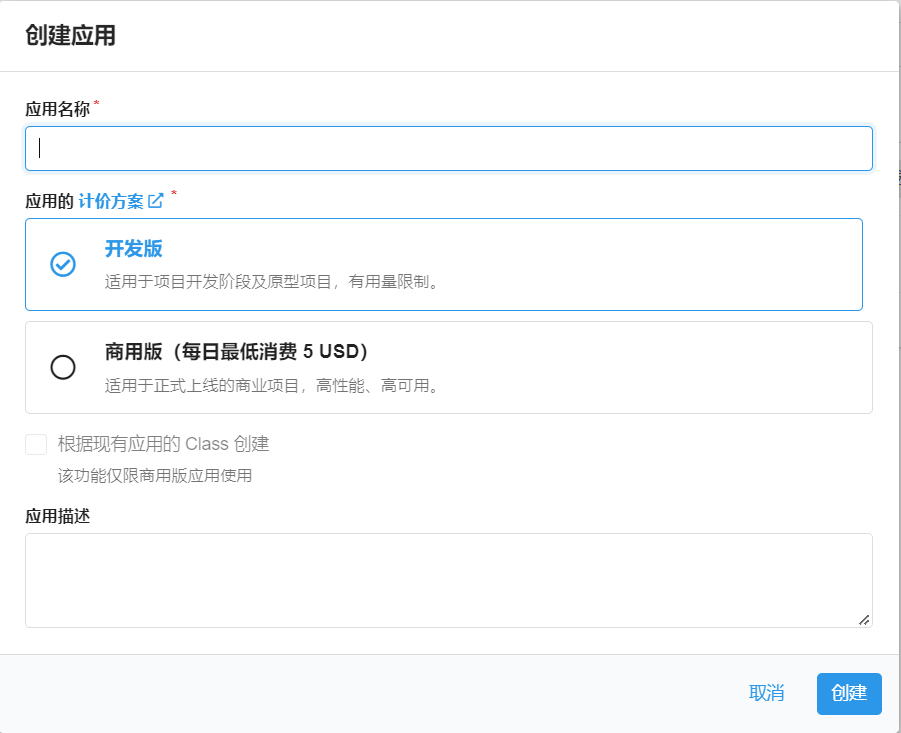
2. Click [Create Application](https://console.leancloud.app/apps) in the upper left corner and choose a name
|
|
you like (please select the free development plan):
|
|
|
|
|
|
|
|
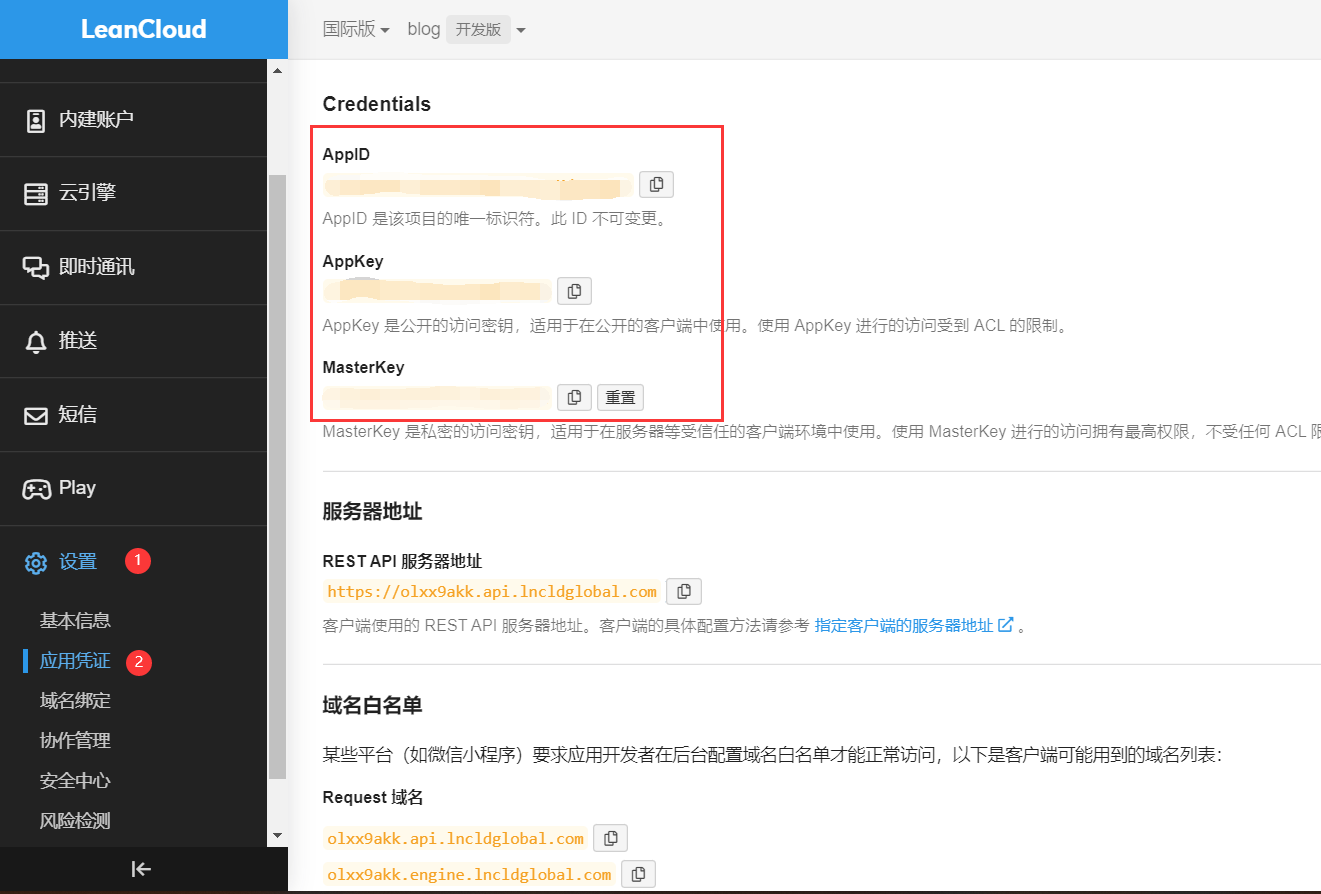
3. Enter the application, select `Settings` > `Application Keys` in the lower left corner.
|
|
You can see your `APP ID`, `APP Key`, and `Master Key`. Please record them for later use.
|
|
|
|
|
|
|
|
:::
|
|
|
|
::: warning Domestic version requires ICP filing
|
|
|
|
If you are using the LeanCloud domestic version ([leancloud.cn](https://leancloud.cn)), we recommend
|
|
switching to the international version ([leancloud.app](https://leancloud.app)).
|
|
Otherwise, you need to bind an **already ICP-filed** domain to the application, purchase an independent IP, and complete the ICP filing process:
|
|
|
|
- Log in to the domestic version and enter the application you need to use
|
|
- Select `Settings` > `Domain Binding` > `API Access Domain` > `Bind New Domain` > Enter domain > `OK`.
|
|
- Follow the instructions on the page to complete the CNAME resolution in DNS as required.
|
|
- Purchase an independent IP and submit a work order to complete the ICP filing. (The current price for an independent IP is ¥50/month)
|
|
|
|
|
|
|
|
:::
|
|
|
|
### Vercel Deployment (Server)
|
|
|
|
[](https://vercel.com/new/clone?repository-url=https%3A%2F%2Fgithub.com%2Fwalinejs%2Fwaline%2Ftree%2Fmain%2Fexample)
|
|
|
|
:::: steps
|
|
|
|
1. Click the button above to jump to Vercel for server-side deployment.
|
|
|
|
::: note
|
|
|
|
If you are not logged in, Vercel will prompt you to register or log in. Please use your GitHub account for quick login.
|
|
|
|
:::
|
|
|
|
2. Enter a Vercel project name you like and click `Create` to continue:
|
|
|
|
|
|
|
|
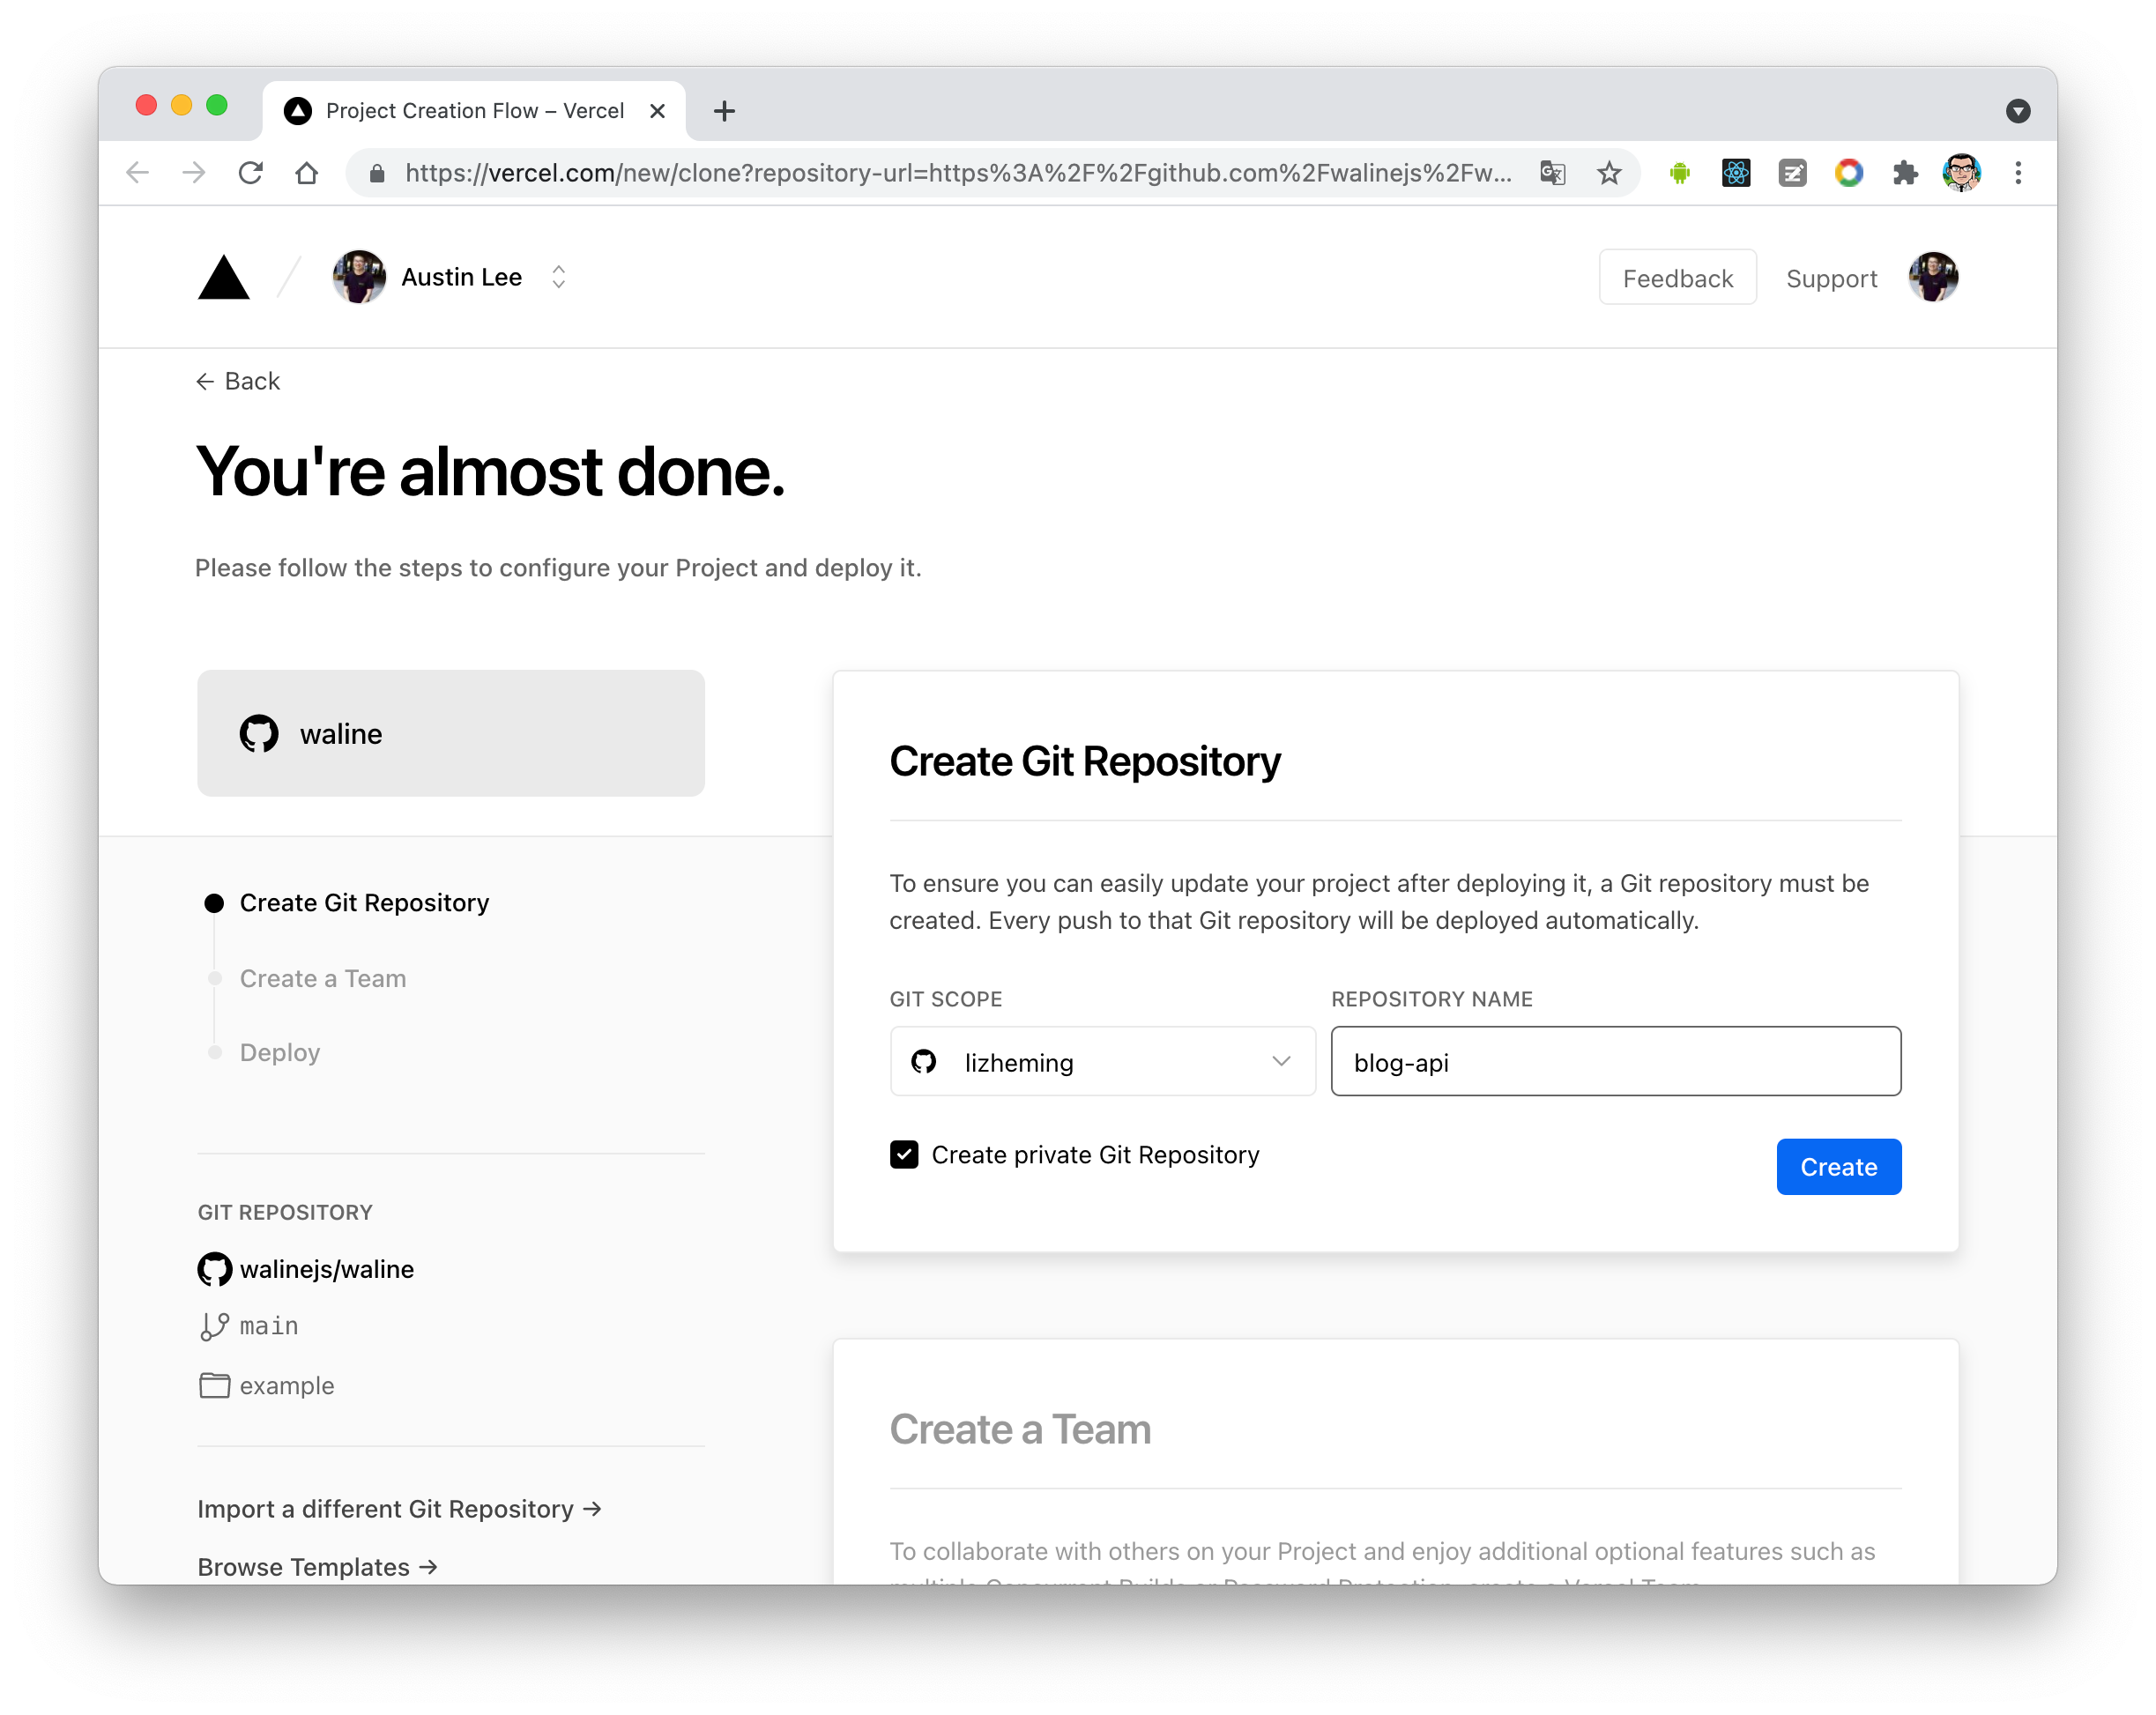
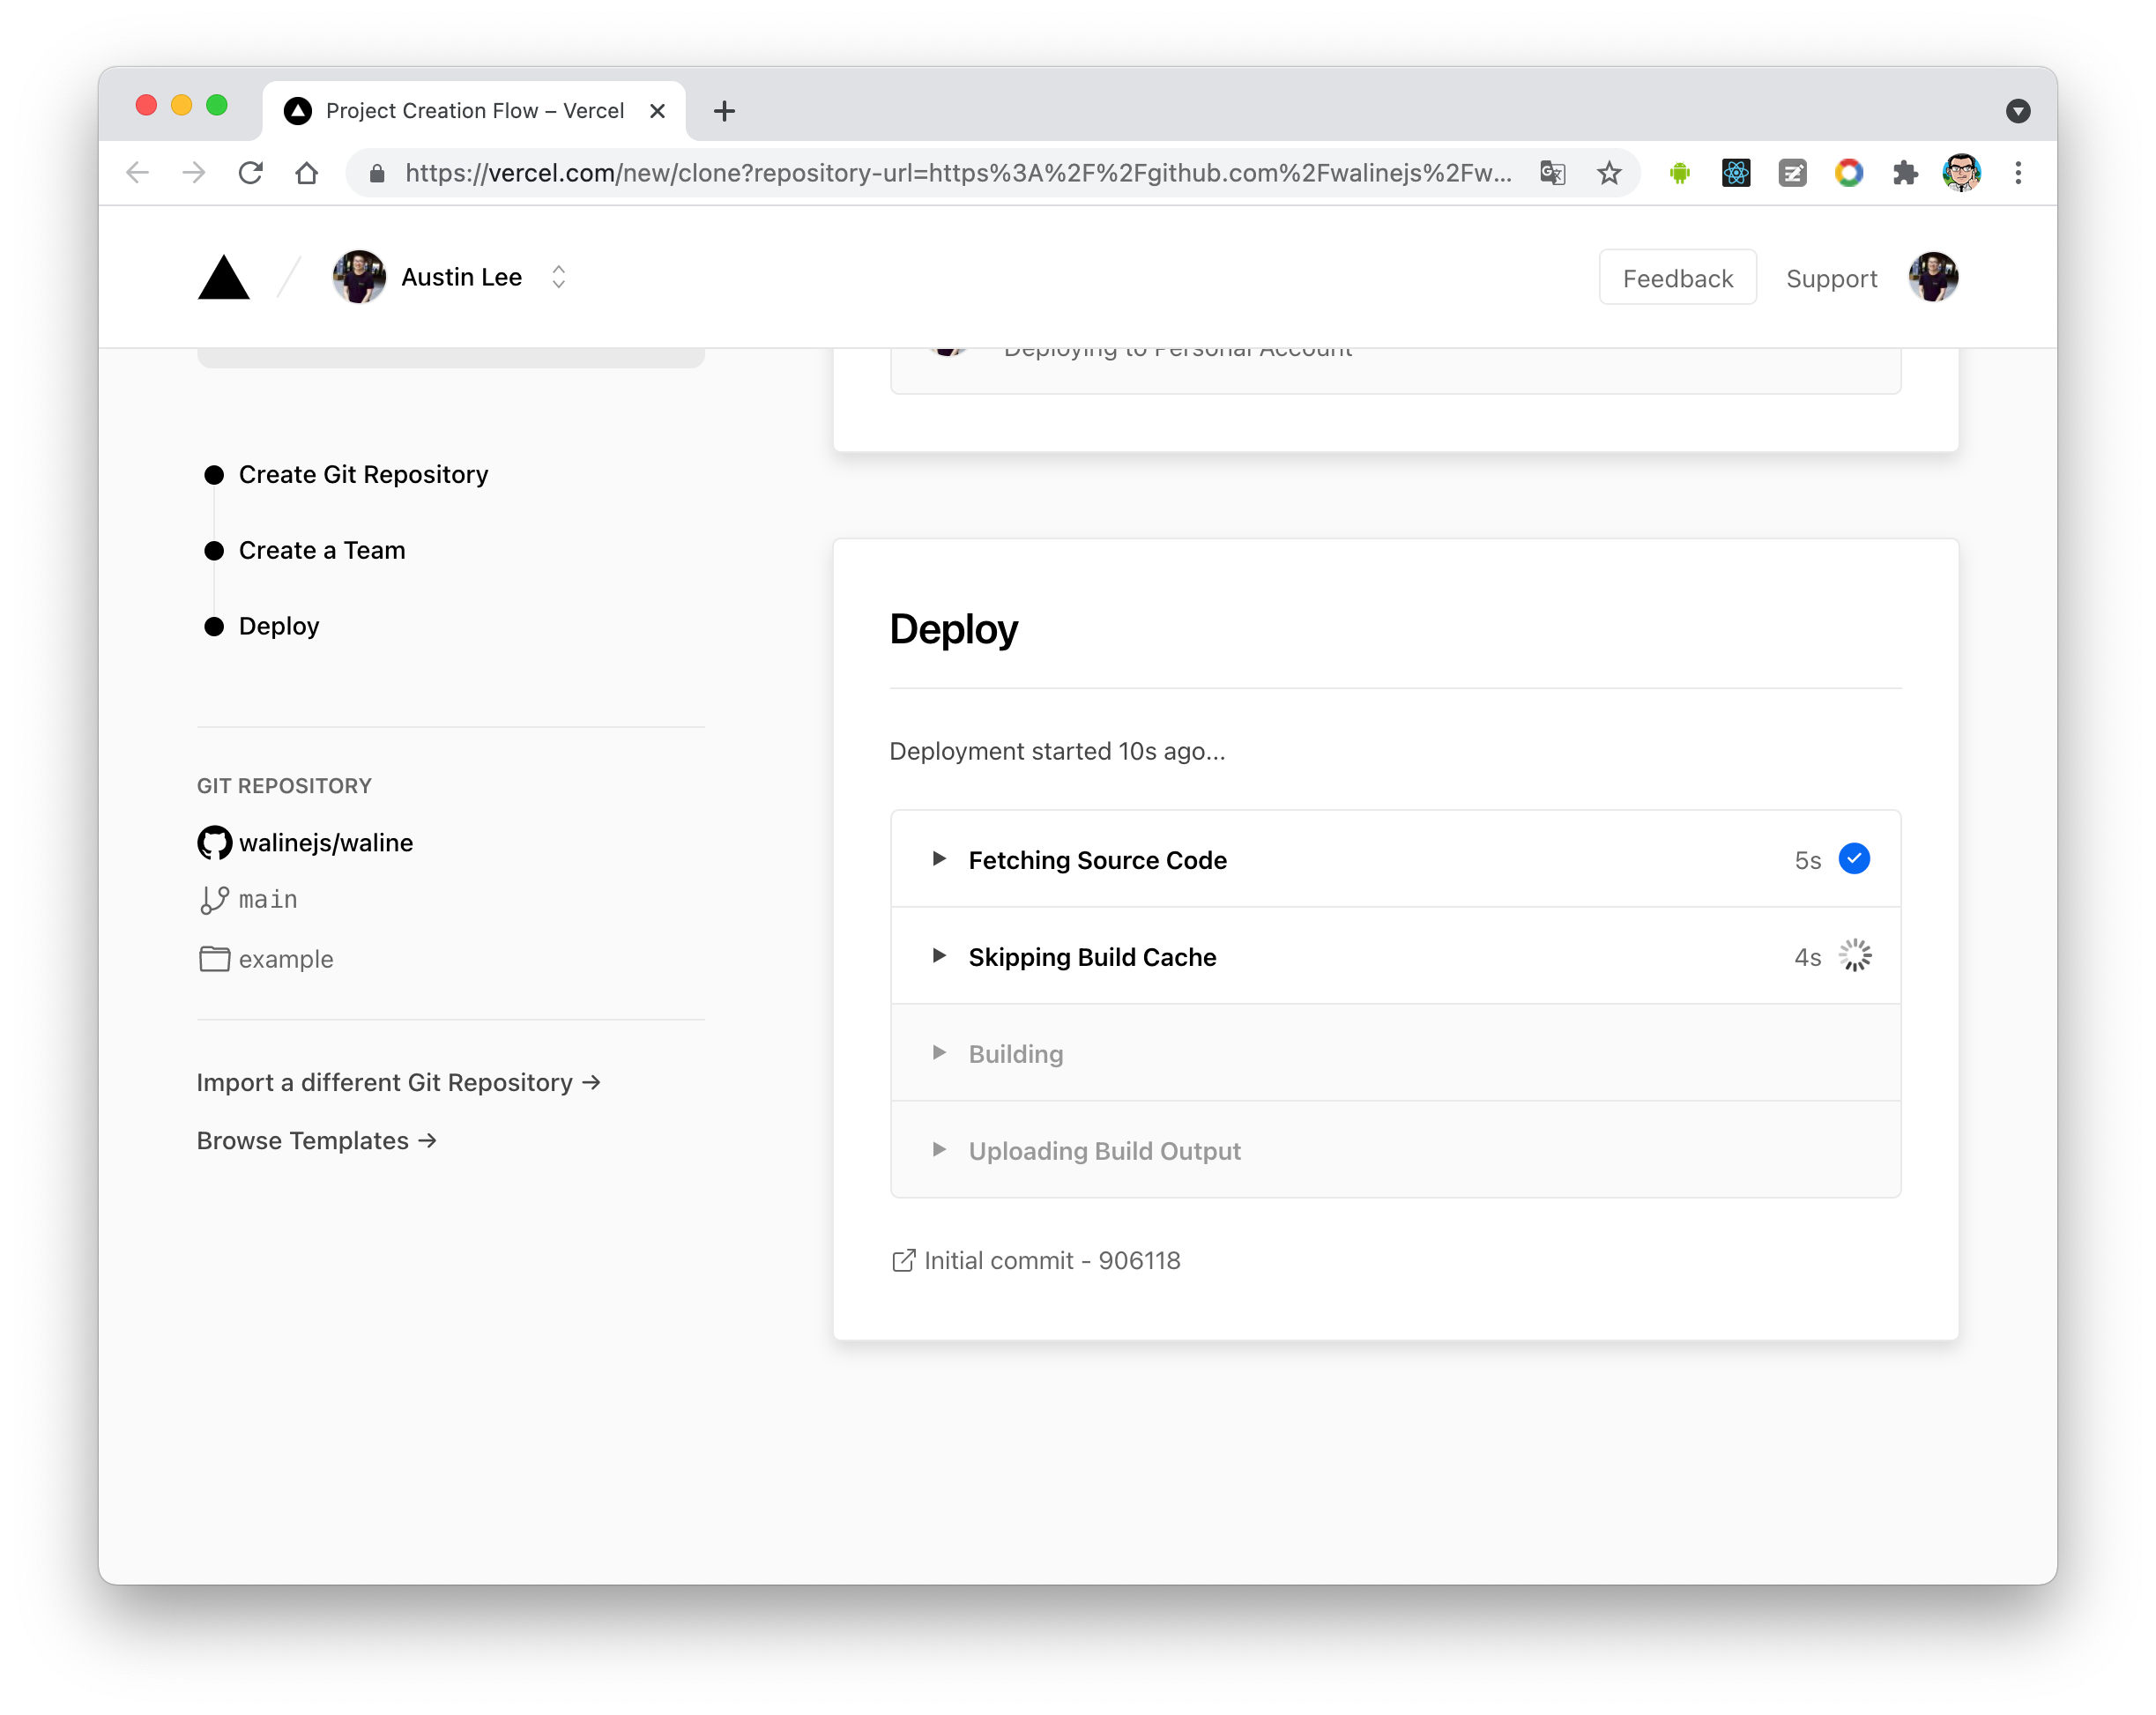
3. At this point, Vercel will help you create and initialize a repository based on the Waline template,
|
|
with the repository name being the project name you entered earlier.
|
|
|
|
|
|
|
|
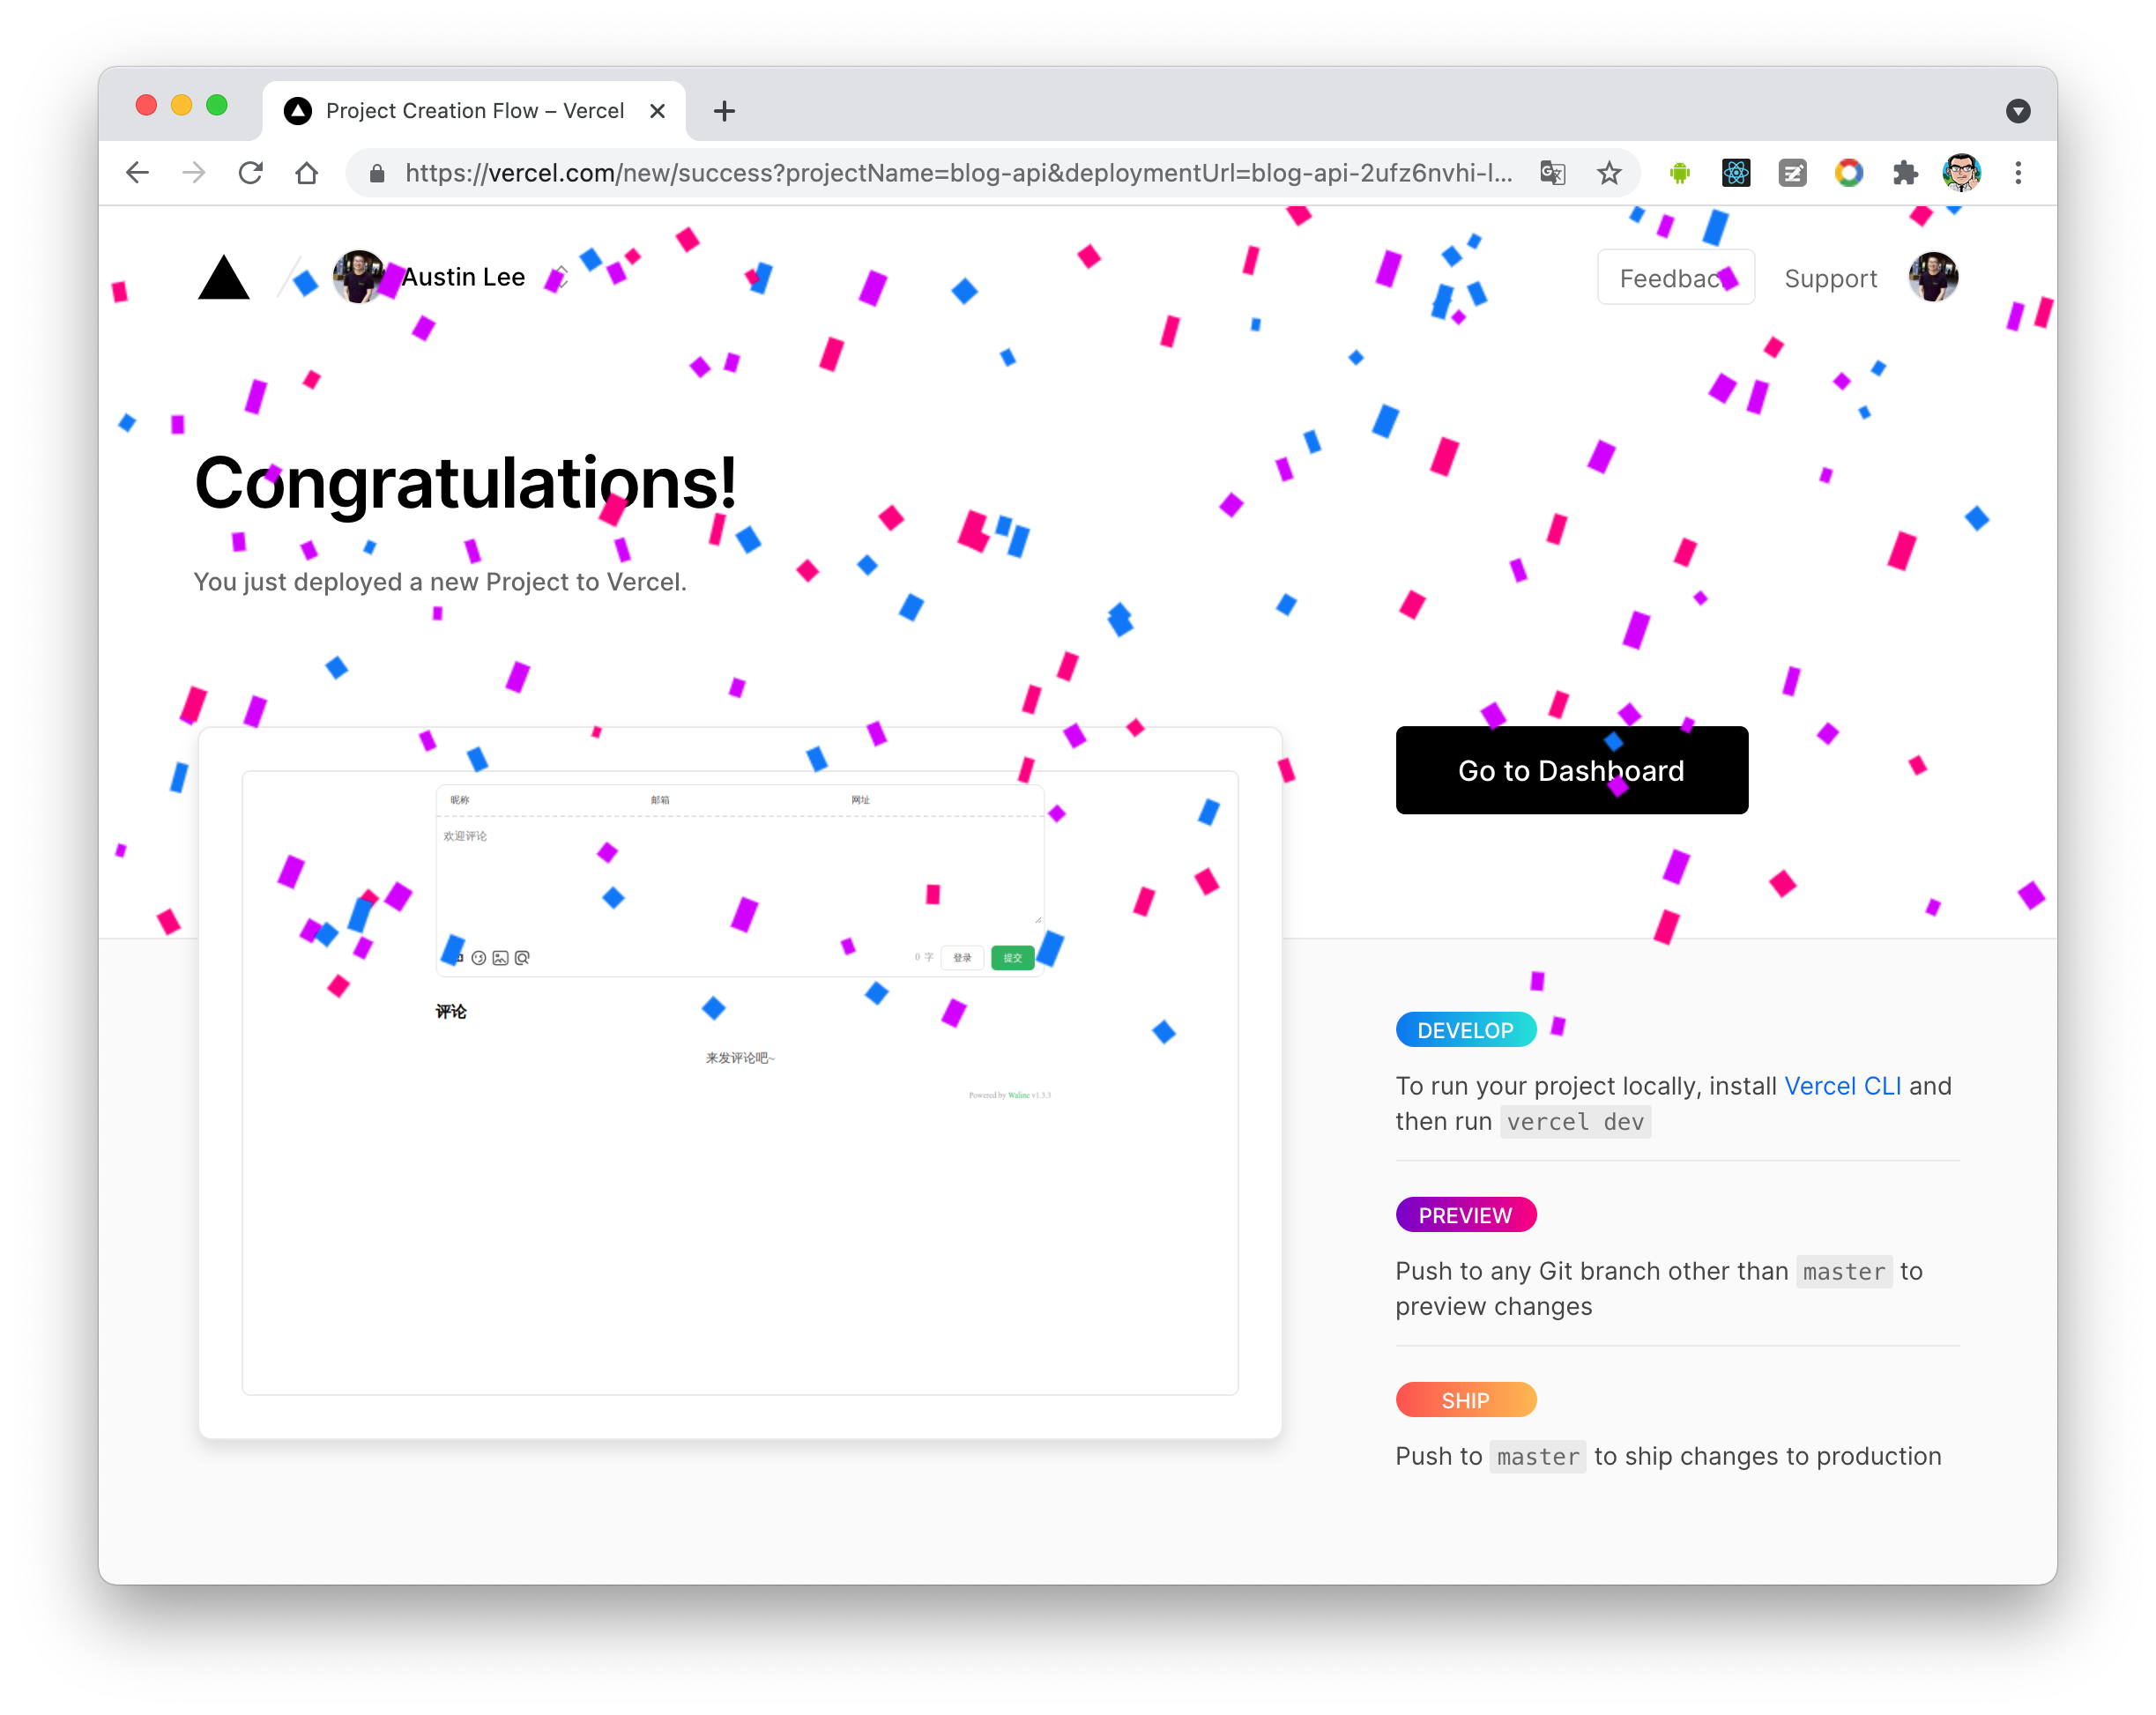
After a minute or two, a full screen of fireworks will celebrate your successful deployment.
|
|
Click `Go to Dashboard` to jump to the application's console.
|
|
|
|
|
|
|
|
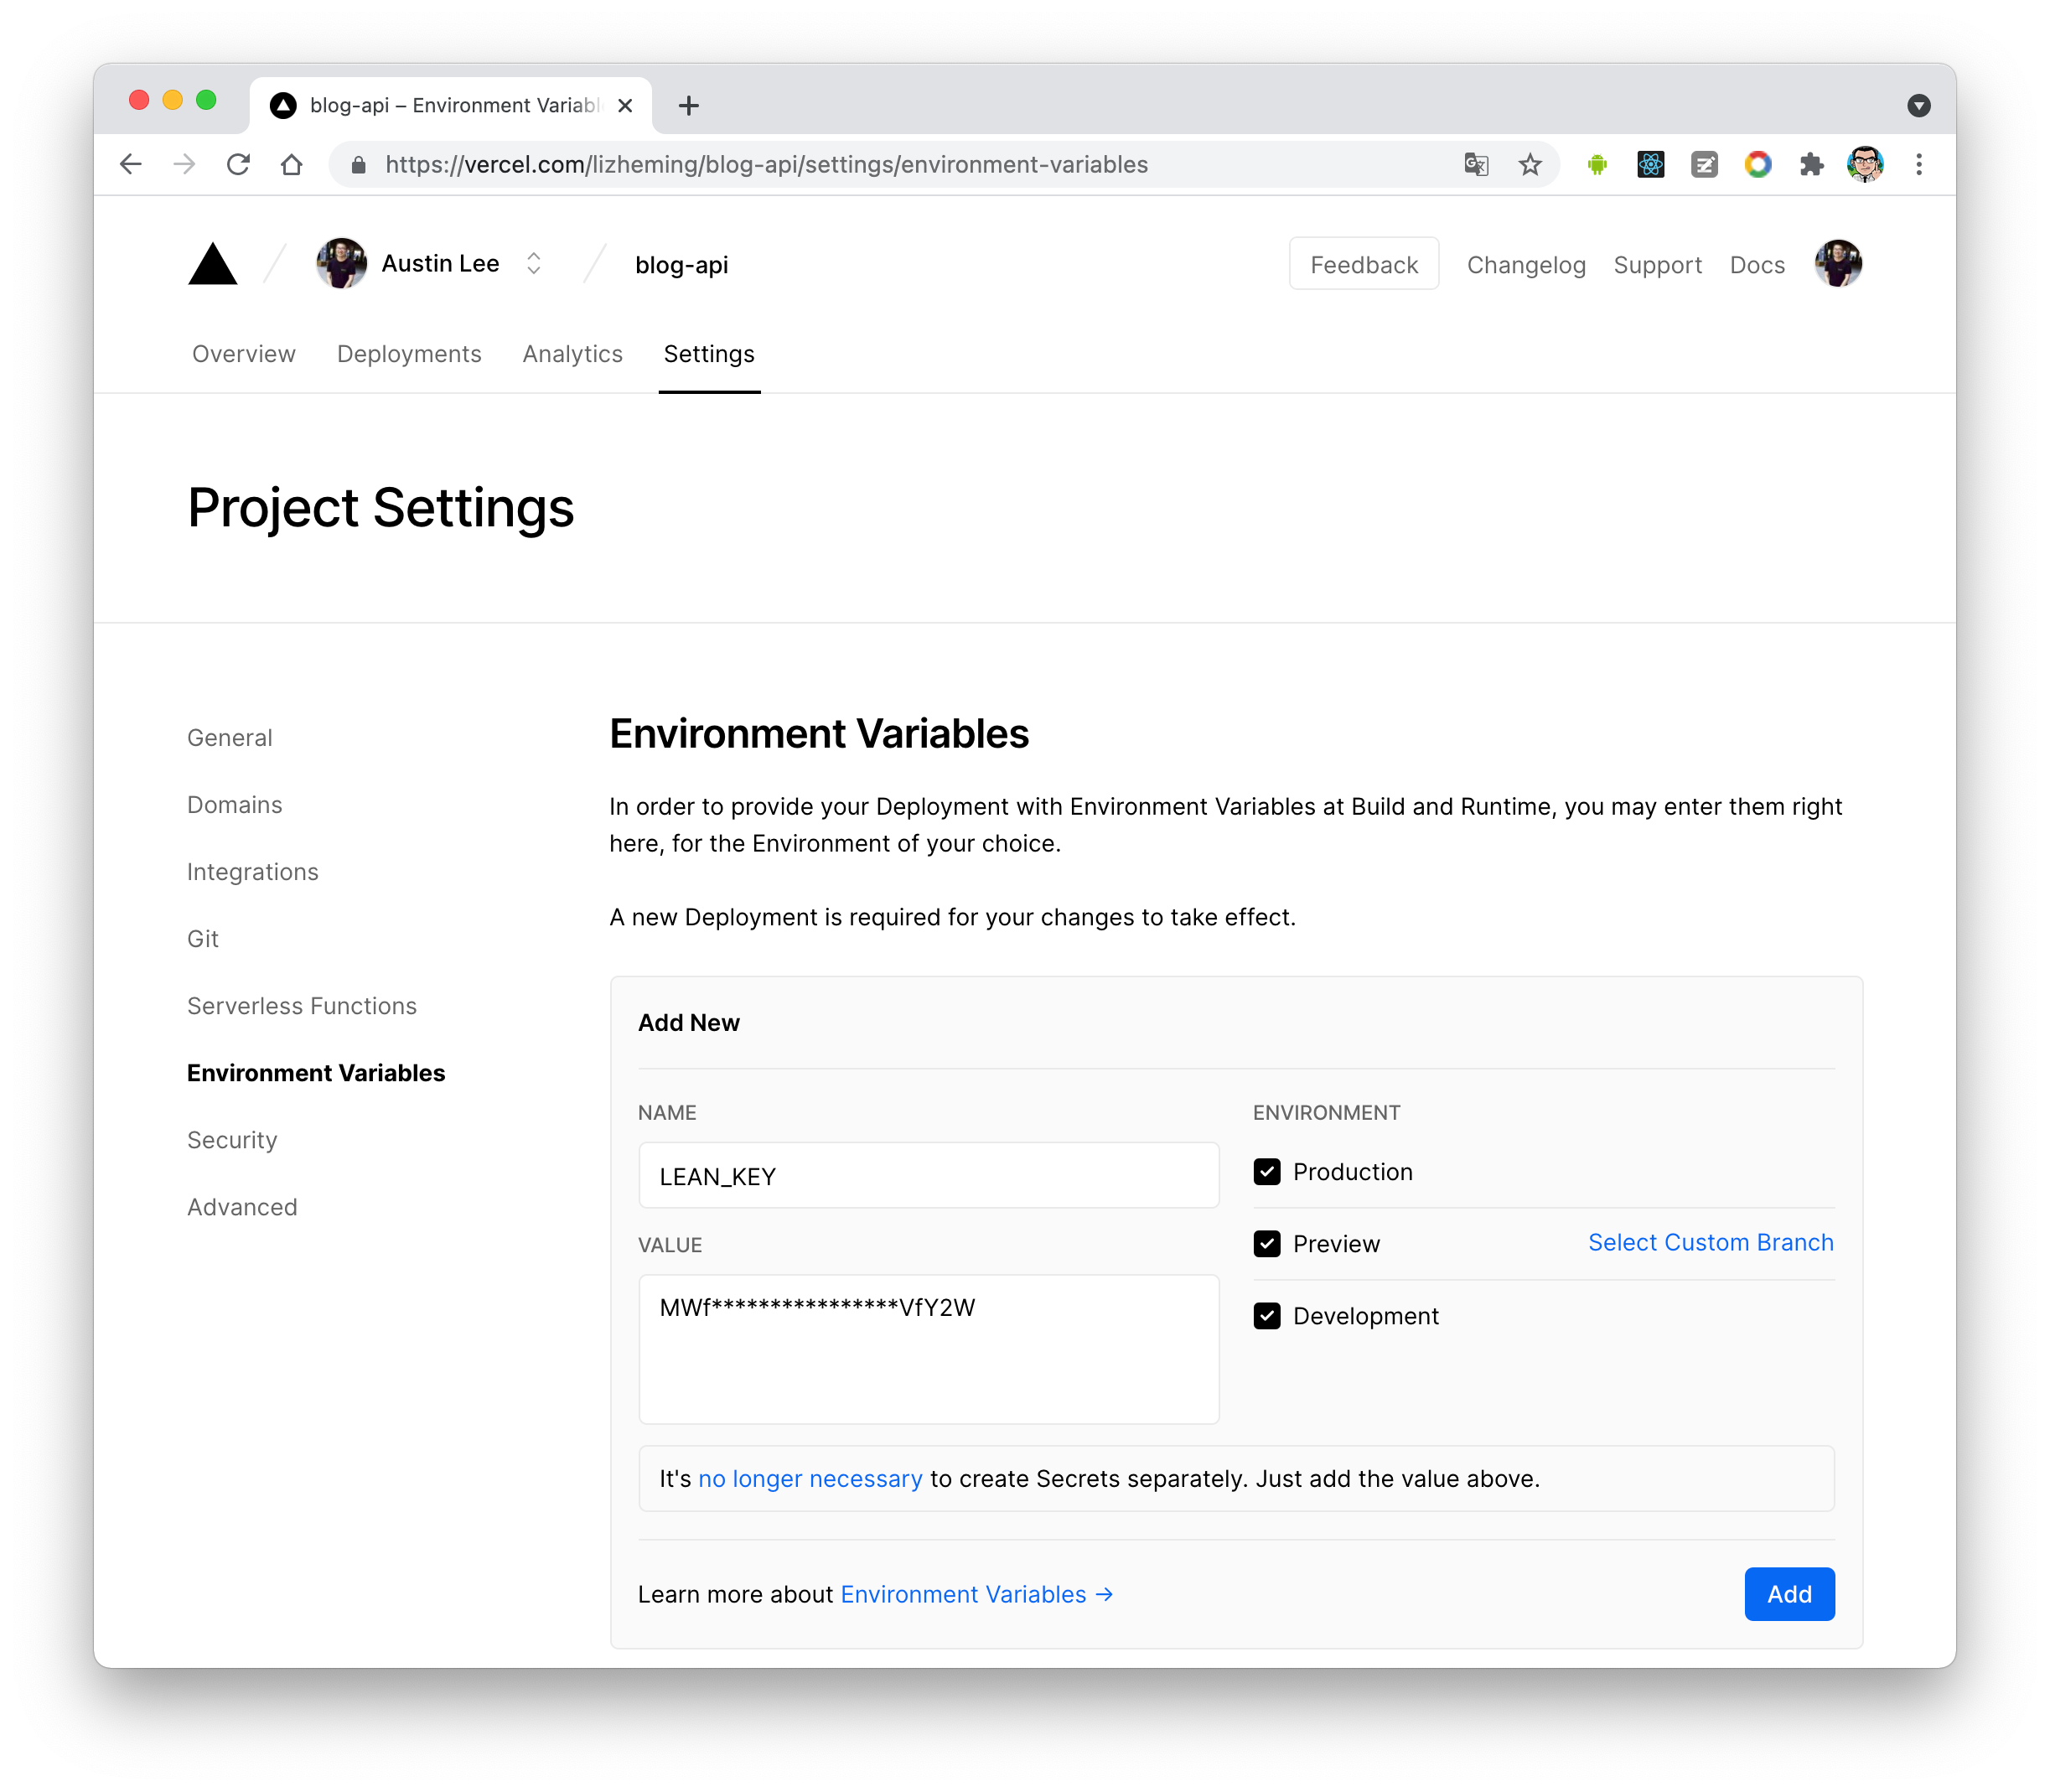
4. Click `Settings` at the top - `Environment Variables` to enter the environment variable configuration page,
|
|
and configure the three environment variables `LEAN_ID`, `LEAN_KEY`, and `LEAN_MASTER_KEY`.
|
|
Their values correspond to the `APP ID`, `APP KEY`, and `Master Key` obtained from LeanCloud in the previous step, respectively.
|
|
|
|
|
|
|
|
::: note
|
|
|
|
If you are using the LeanCloud domestic version, please additionally configure the `LEAN_SERVER`
|
|
environment variable with the value of your bound domain.
|
|
|
|
:::
|
|
|
|
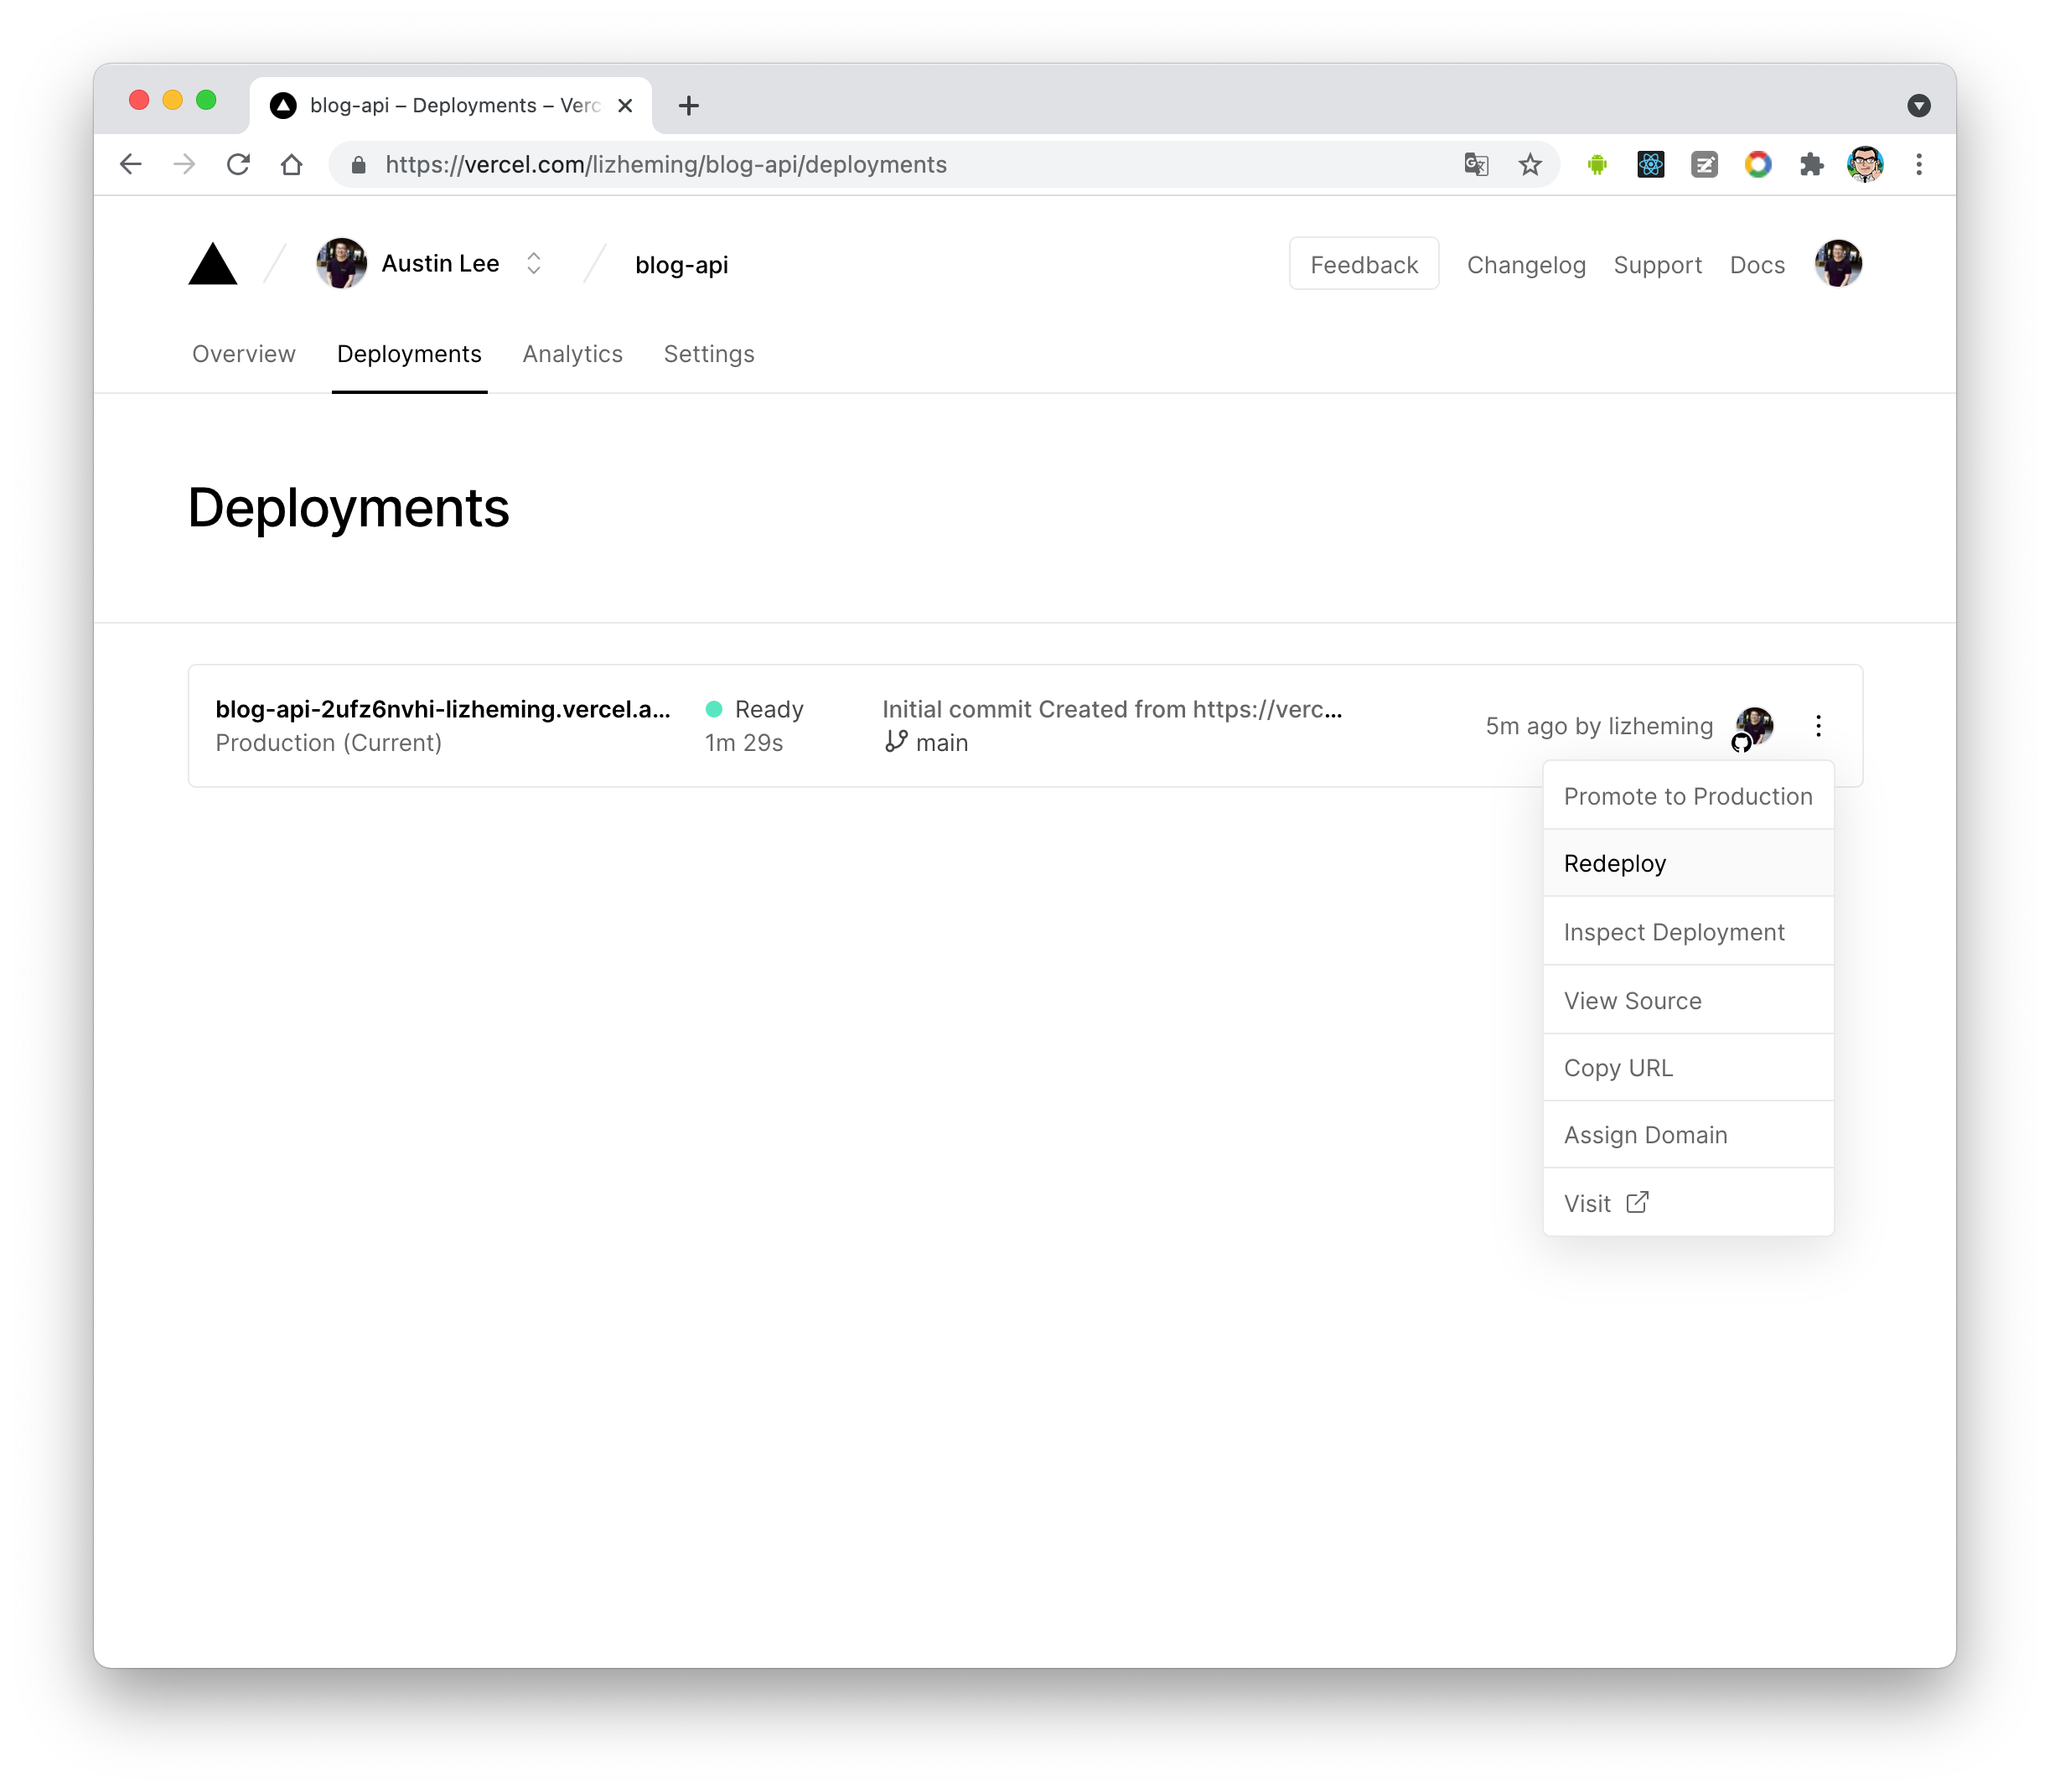
5. After configuring the environment variables, click `Deployments` at the top,
|
|
then click the `Redeploy` button on the right side of the latest deployment to redeploy.
|
|
This step is to make the environment variables you just set take effect.
|
|
|
|
|
|
|
|
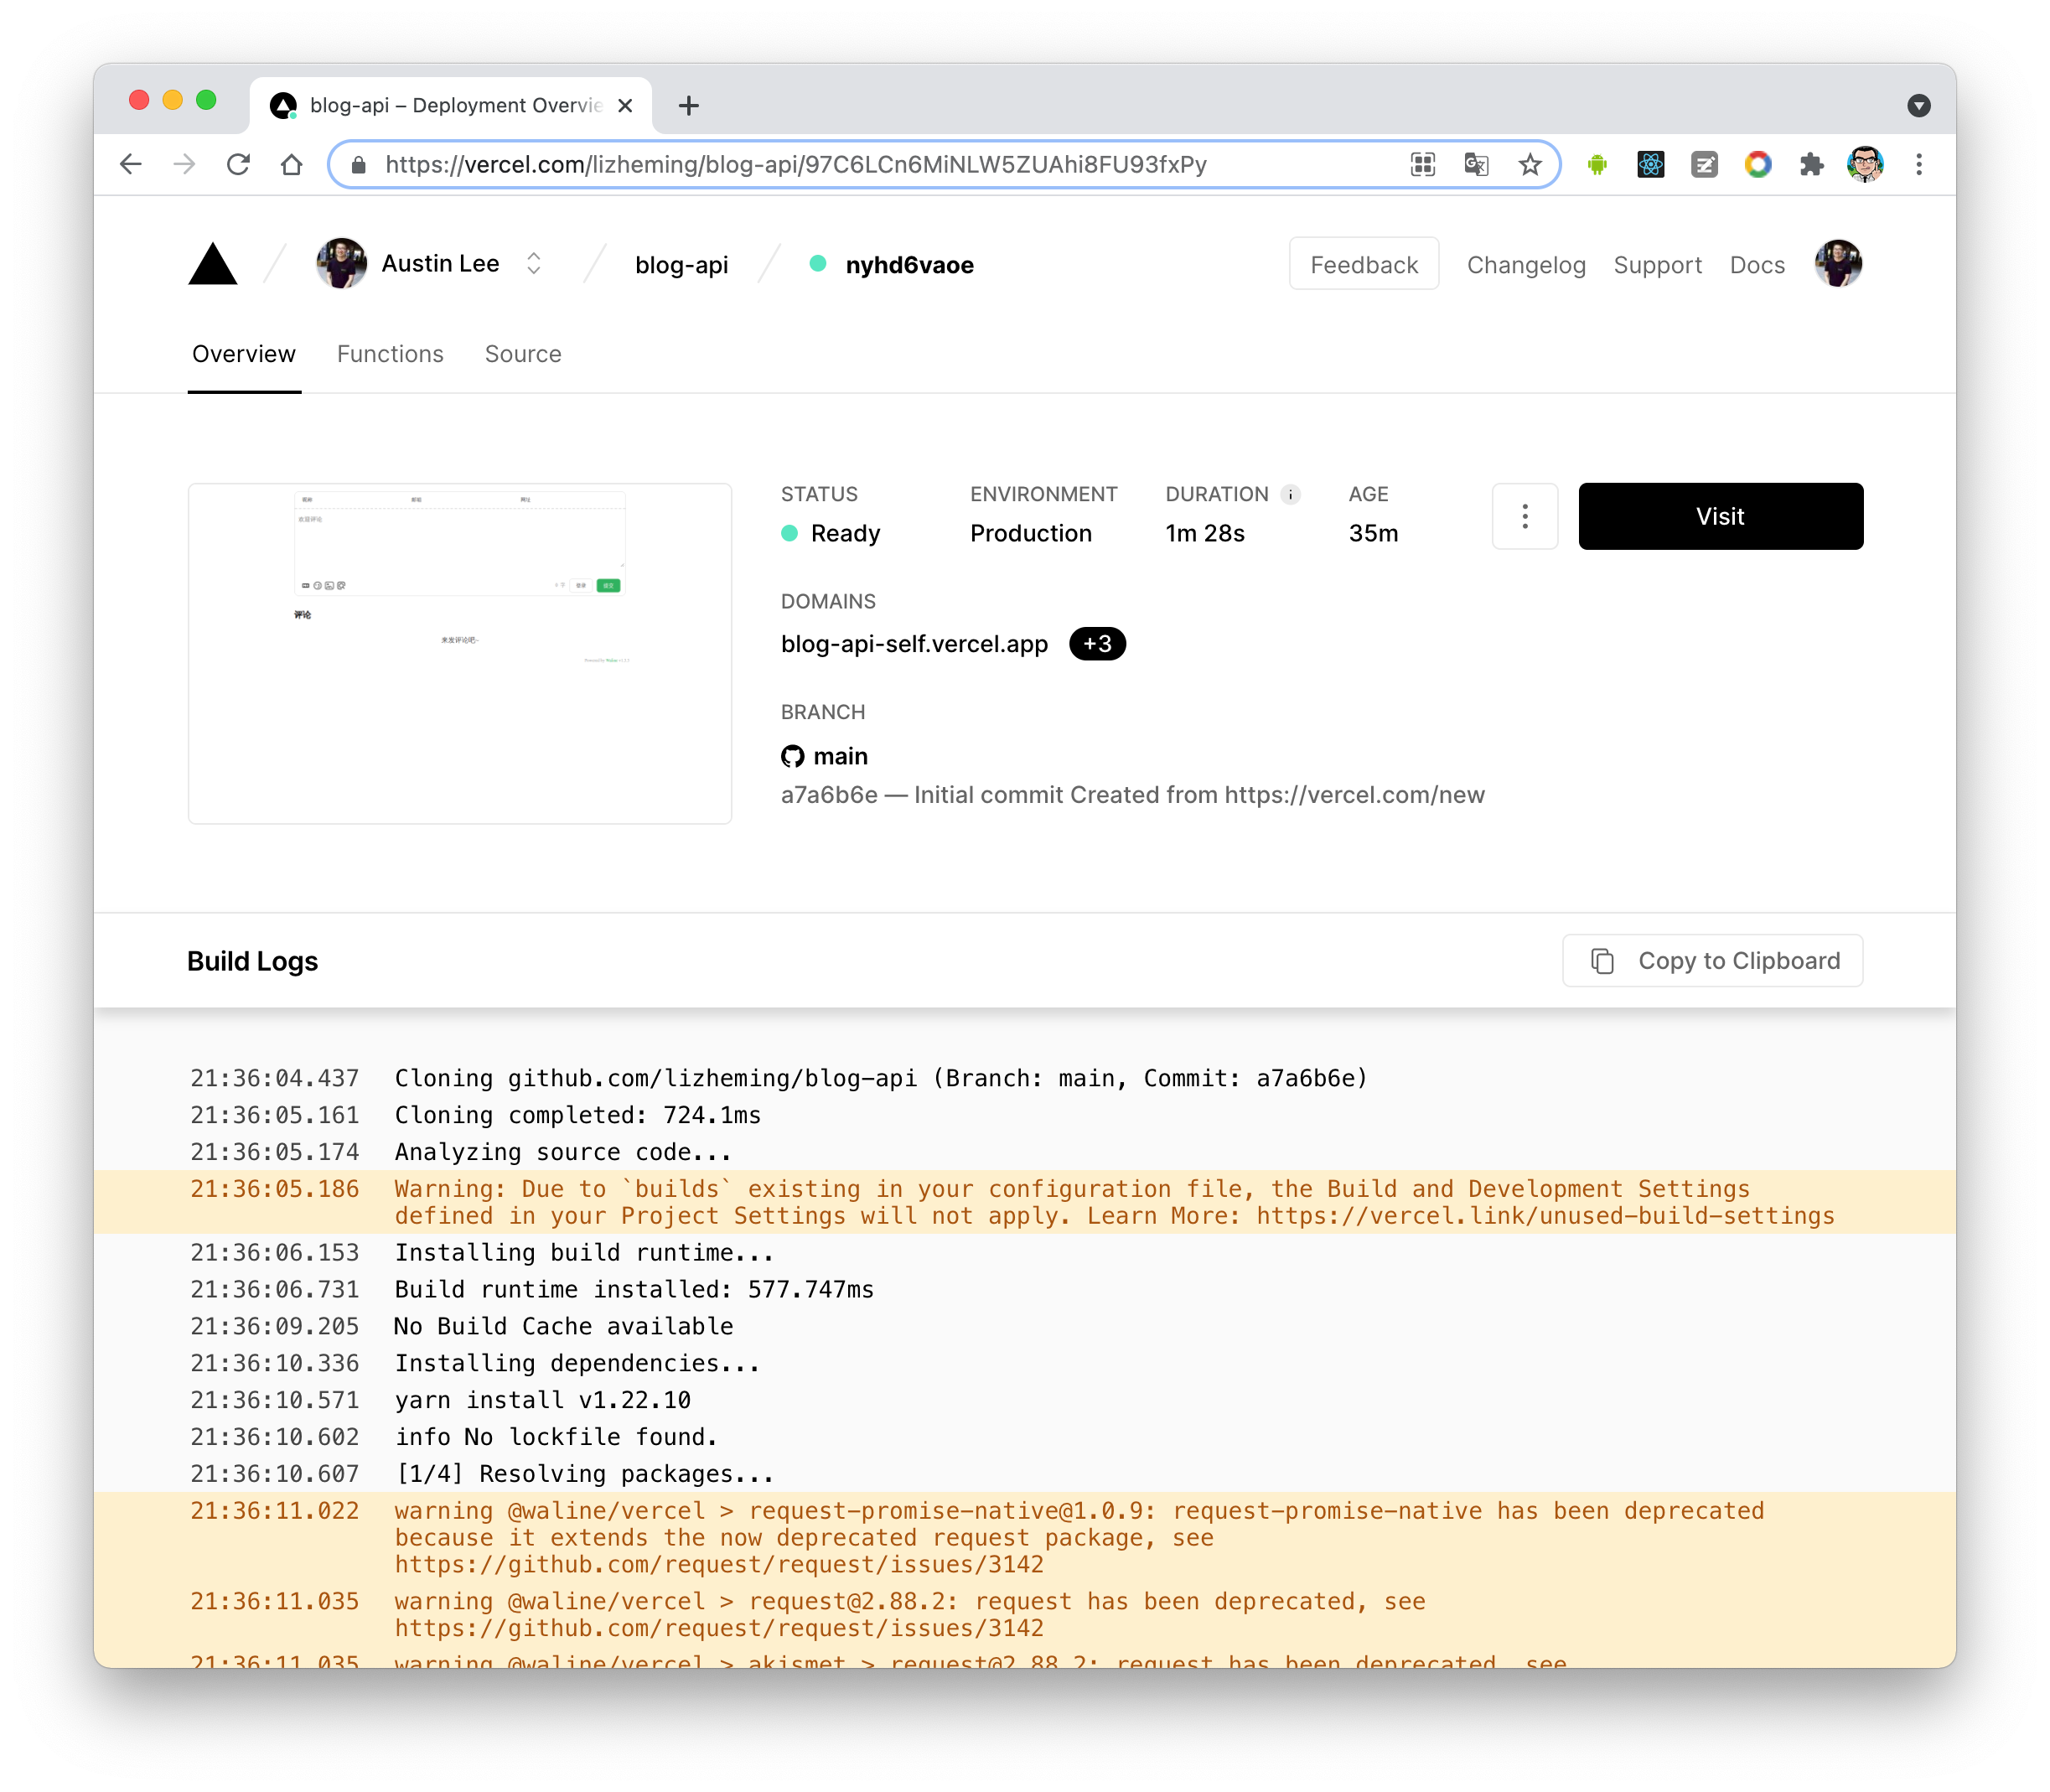
6. At this point, it will jump to the `Overview` interface to start deployment.
|
|
Wait a moment until the `STATUS` becomes `Ready`. Then click `Visit` to jump to the deployed
|
|
website address, which is your server address.
|
|
|
|
|
|
|
|
::::
|
|
|
|
### Domain Binding (Optional)
|
|
|
|
::: steps
|
|
|
|
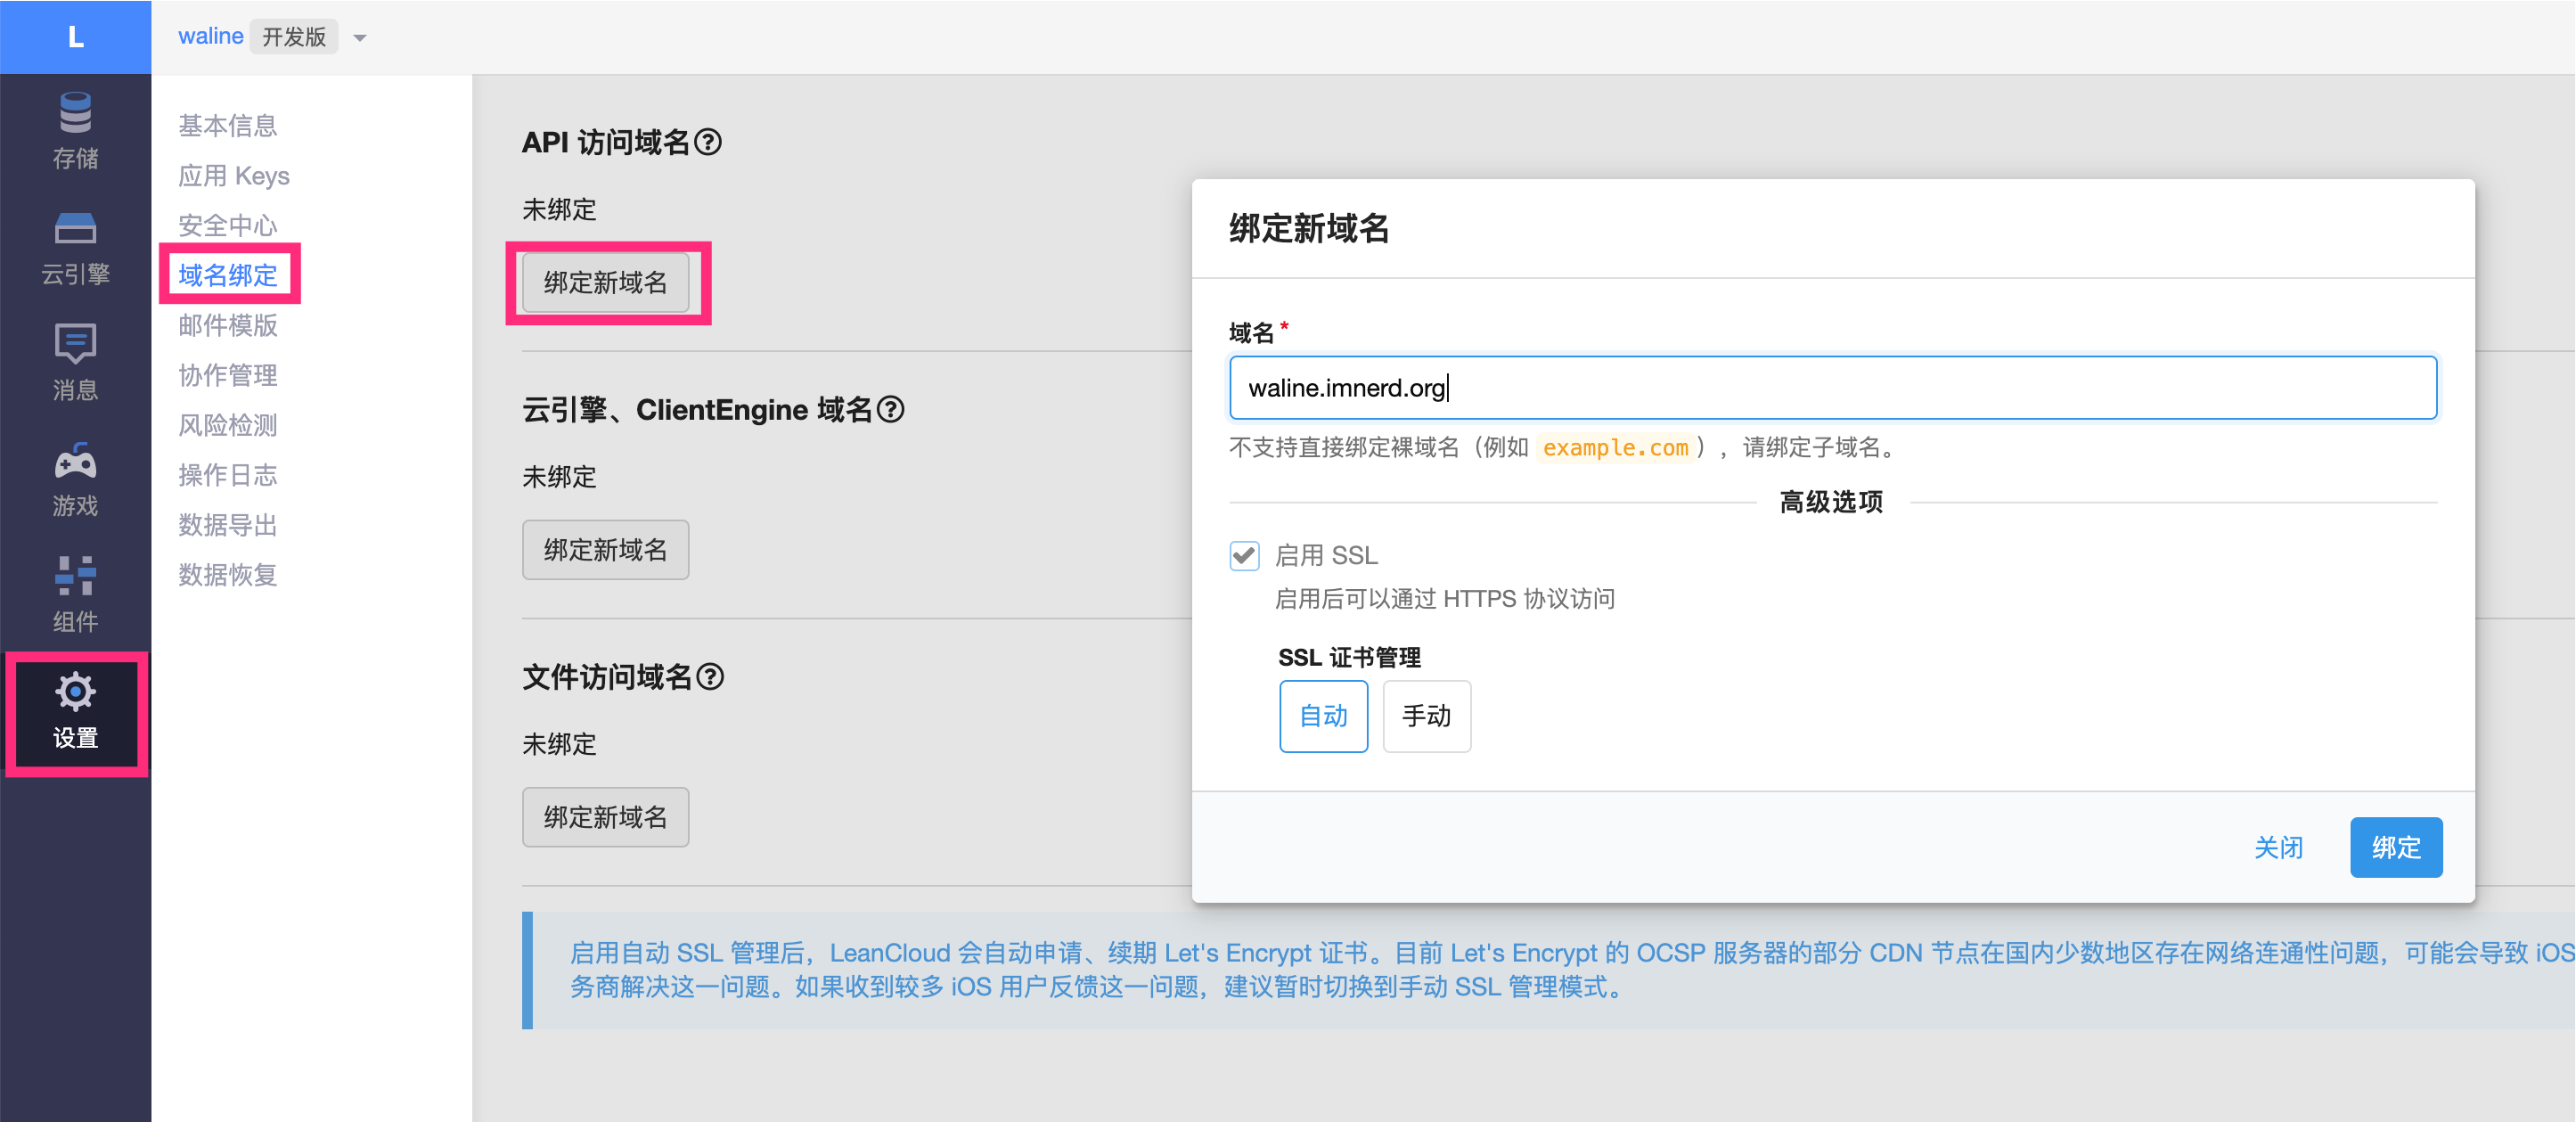
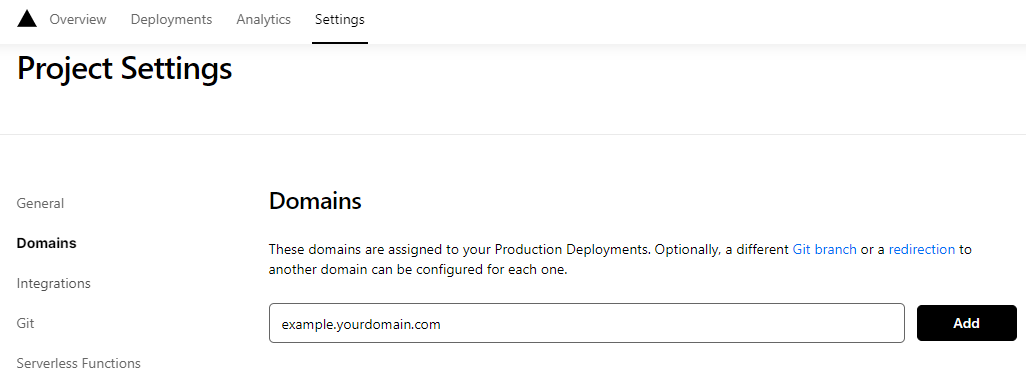
1. Click `Settings` - `Domains` at the top to enter the domain configuration page.
|
|
|
|
2. Enter the domain you want to bind and click `Add`.
|
|
|
|
|
|
|
|
3. Add a new `CNAME` record at your domain DNS provider.
|
|
|
|
| Type | Name | Value |
|
|
| ----- | ------- | -------------------- |
|
|
| CNAME | example | cname.vercel-dns.com |
|
|
|
|
4. Wait for it to take effect. You can now access it via your own domain :tada:
|
|
|
|
- Comment system: example.your-domain.com
|
|
- Comment management: example.your-domain.com/ui
|
|
|
|

|
|
|
|
:::
|
|
|
|
### Client
|
|
|
|
#### Using the Plugin
|
|
|
|
Set `provider: "Waline"` in the plugin options, and set the server address `serverURL` to the value obtained in the previous step.
|
|
|
|
At this point, place the `<CommentService>` component in a suitable location on your website
|
|
(usually at the bottom of the page) to use the Waline comment functionality.
|
|
|
|
::: tip
|
|
|
|
You can also pass other options supported by Waline (except `el`). For details, see [Waline Configuration](https://ecosystem.vuejs.press/zh/plugins/blog/comment/waline/config.html).
|
|
|
|
:::
|
|
|
|
### Comment Management (Admin Panel)
|
|
|
|
::: steps
|
|
|
|
1. After deployment is complete, please visit `<serverURL>/ui/register` to register. The first person to register will be set as the administrator.
|
|
|
|
2. After logging in as an administrator, you can see the comment management interface. Here you can modify, mark, or delete comments.
|
|
|
|
3. Users can also register accounts through the comment box. After logging in, they will be redirected to their own profile page.
|
|
|
|
:::
|