mirror of
https://github.com/pengzhanbo/vuepress-theme-plume.git
synced 2026-04-23 10:58:13 +08:00
252 lines
8.5 KiB
Markdown
252 lines
8.5 KiB
Markdown
---
|
||
title: 评论
|
||
icon: la:comment
|
||
createTime: 2024/03/04 11:58:59
|
||
permalink: /guide/features/comments/
|
||
---
|
||
|
||
## 概述
|
||
|
||
文章评论由 [@vuepress/plugin-comment](https://ecosystem.vuejs.press/zh/plugins/blog/comment/) 提供支持。
|
||
|
||
主题已内置插件,你无需重新安装即可使用。
|
||
|
||
在本主题中,通过以下字段进行配置:
|
||
|
||
```ts title=".vuepress/config.ts"
|
||
import { defineUserConfig } from 'vuepress'
|
||
import { plumeTheme } from 'vuepress-theme-plume'
|
||
|
||
export default defineUserConfig({
|
||
theme: plumeTheme({
|
||
comment: {
|
||
// 服务提供商
|
||
provider: '', // "Artalk" | "Giscus" | "Twikoo" | "Waline"
|
||
// 是否默认启用评论
|
||
comment: true,
|
||
|
||
// 其它配置,根据服务提供商进行配置
|
||
// ...
|
||
}
|
||
})
|
||
})
|
||
```
|
||
|
||
### 服务提供商
|
||
|
||
[@vuepress/plugin-comment](https://ecosystem.vuejs.press/zh/plugins/blog/comment/) 支持
|
||
`"Artalk" | "Giscus" | "Twikoo" | "Waline"` 等多种不同的评论服务提供商。
|
||
|
||
你可以根据自己的需求进行配置。
|
||
|
||
- `Giscus` 是一个基于 GitHub Discussion 的评论系统,启用简便。[查看文档](https://ecosystem.vuejs.press/zh/plugins/blog/comment/giscus/)
|
||
- `Waline` 是一个 需要后端的评论系统,安全性较高。[查看文档](https://ecosystem.vuejs.press/zh/plugins/blog/comment/waline/)
|
||
- `Twikoo` 一个简洁、安全、免费的静态网站评论系统,基于 腾讯云开发。[查看文档](https://ecosystem.vuejs.press/zh/plugins/blog/comment/twikoo/)
|
||
- `Artalk` 是一款简洁的自托管评论系统,你可以在服务器上轻松部署并置入前端页面中。[查看文档](https://ecosystem.vuejs.press/zh/plugins/blog/comment/artalk/)
|
||
|
||
::: tip 推荐的评论服务
|
||
|
||
- 面向程序员和开发人员: Giscus
|
||
- 面向公众: Waline
|
||
:::
|
||
|
||
::: note
|
||
示例 Fork 自 [@vuepress/plugin-comment](https://ecosystem.vuejs.press/zh/plugins/blog/comment/),
|
||
遵循 [MIT](https://github.com/vuepress/ecosystem/blob/main/LICENSE) 许可证。
|
||
:::
|
||
|
||
## Giscus
|
||
|
||
Giscus 是一个基于 GitHub Discussion 的评论系统,启用简便。
|
||
|
||
### 准备工作
|
||
|
||
::: steps
|
||
|
||
1. 你需要创建一个公开仓库,并开启评论区,以作为评论存放的地点
|
||
|
||
2. 你需要安装 [Giscus App](https://github.com/apps/giscus),使其有权限访问对应仓库。
|
||
|
||
3. 在完成以上步骤后,请前往 [Giscus 页面](https://giscus.app/zh-CN) 获得你的设置。
|
||
|
||
你只需要填写仓库和 Discussion 分类,之后滚动到页面下部的 “启用 giscus” 部分,
|
||
获取 `data-repo`, `data-repo-id`, `data-category` 和 `data-category-id` 这四个属性。
|
||
|
||
:::
|
||
|
||
### 配置
|
||
|
||
请配置 `provider: 'Giscus'` 并将 `data-repo`, `data-repo-id`, `data-category` 和 `data-category-id`
|
||
作为插件选项传入 `repo`, `repoId`, `category`, `categoryId` 。
|
||
|
||
```ts title=".vuepress/config.ts"
|
||
import { defineUserConfig } from 'vuepress'
|
||
import { plumeTheme } from 'vuepress-theme-plume'
|
||
|
||
export default defineUserConfig({
|
||
theme: plumeTheme({
|
||
comment: {
|
||
provider: 'Giscus', // "Artalk“ | "Giscus" | "Twikoo" | "Waline"
|
||
comment: true,
|
||
repo: 'Your_Repo', // [!code ++]
|
||
repoId: 'Your_RepoId', // [!code ++]
|
||
category: 'Your_Category', // [!code ++]
|
||
categoryId: 'Your_CategoryId', // [!code ++]
|
||
}
|
||
})
|
||
})
|
||
```
|
||
|
||
### 主题
|
||
|
||
默认情况下,Giscus 使用 `light` 或 `dark` 主题 (基于夜间模式状态)。
|
||
|
||
如果你想在日间模式和夜间模式下自定义主题,你可以设置 `lightTheme` 和 `darkTheme` 选项,
|
||
使用内置主题关键字或以 `https://` 开头的自定义 css 链接。
|
||
|
||
## Waline
|
||
|
||
一个有后端的安全评论系统。
|
||
|
||
### 安装
|
||
|
||
如果你想要在主题中使用 Waline, 你需要先安装 `@waline/client`。
|
||
|
||
::: npm-to
|
||
|
||
```sh
|
||
npm i @waline/client
|
||
```
|
||
|
||
:::
|
||
|
||
### LeanCloud 设置 (数据库)
|
||
|
||
::: steps
|
||
|
||
1. [登录](https://console.leancloud.app/login) 或 [注册](https://console.leancloud.app/register) `LeanCloud 国际版` 并进入 [控制台](https://console.leancloud.app/apps)
|
||
|
||
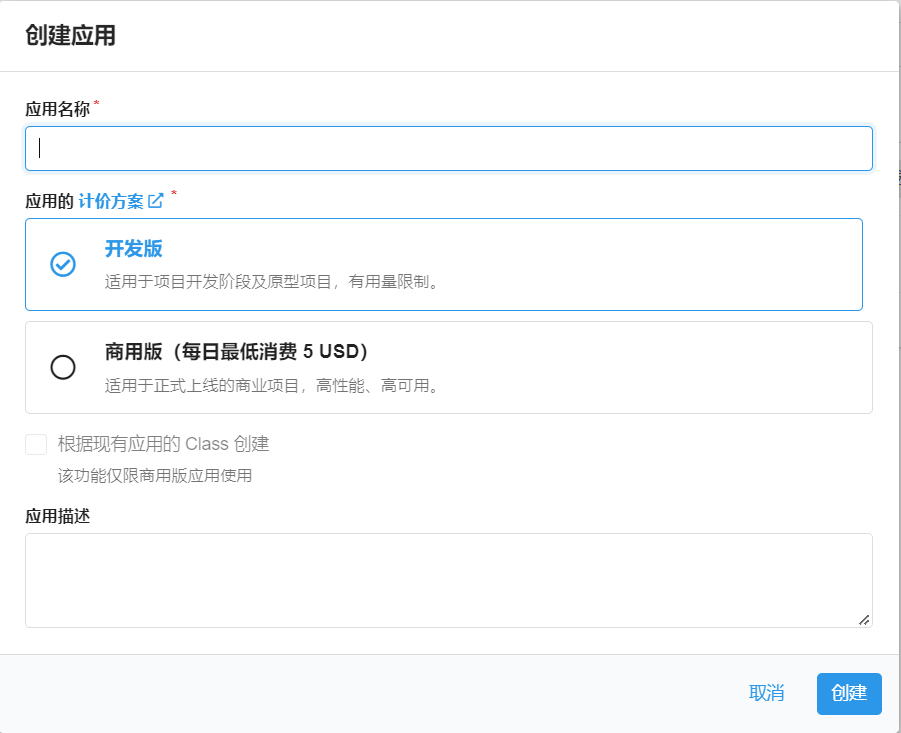
2. 点击左上角 [创建应用](https://console.leancloud.app/apps) 并起一个你喜欢的名字 (请选择免费的开发版):
|
||
|
||
|
||
|
||
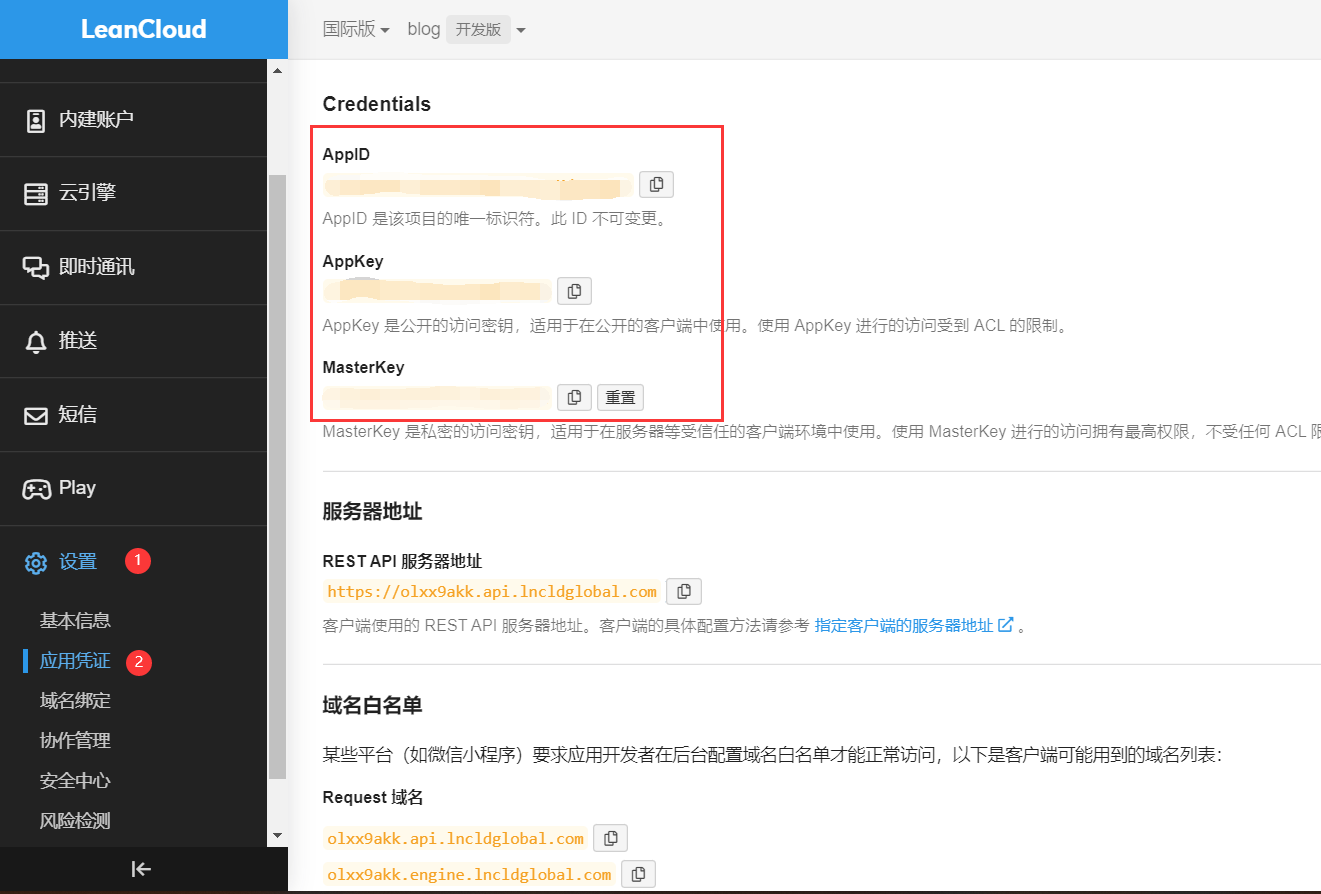
3. 进入应用,选择左下角的 `设置` > `应用 Key`。你可以看到你的 `APP ID`,`APP Key` 和 `Master Key`。
|
||
请记录它们,以便后续使用。
|
||
|
||
|
||
|
||
:::
|
||
|
||
::: warning 国内版需要完成备案接入
|
||
|
||
如果你正在使用 Leancloud 国内版 ([leancloud.cn](https://leancloud.cn)),我们推荐你切换到国际版 ([leancloud.app](https://leancloud.app))。
|
||
否则,你需要为应用额外绑定**已备案**的域名,同时购买独立 IP 并完成备案接入:
|
||
|
||
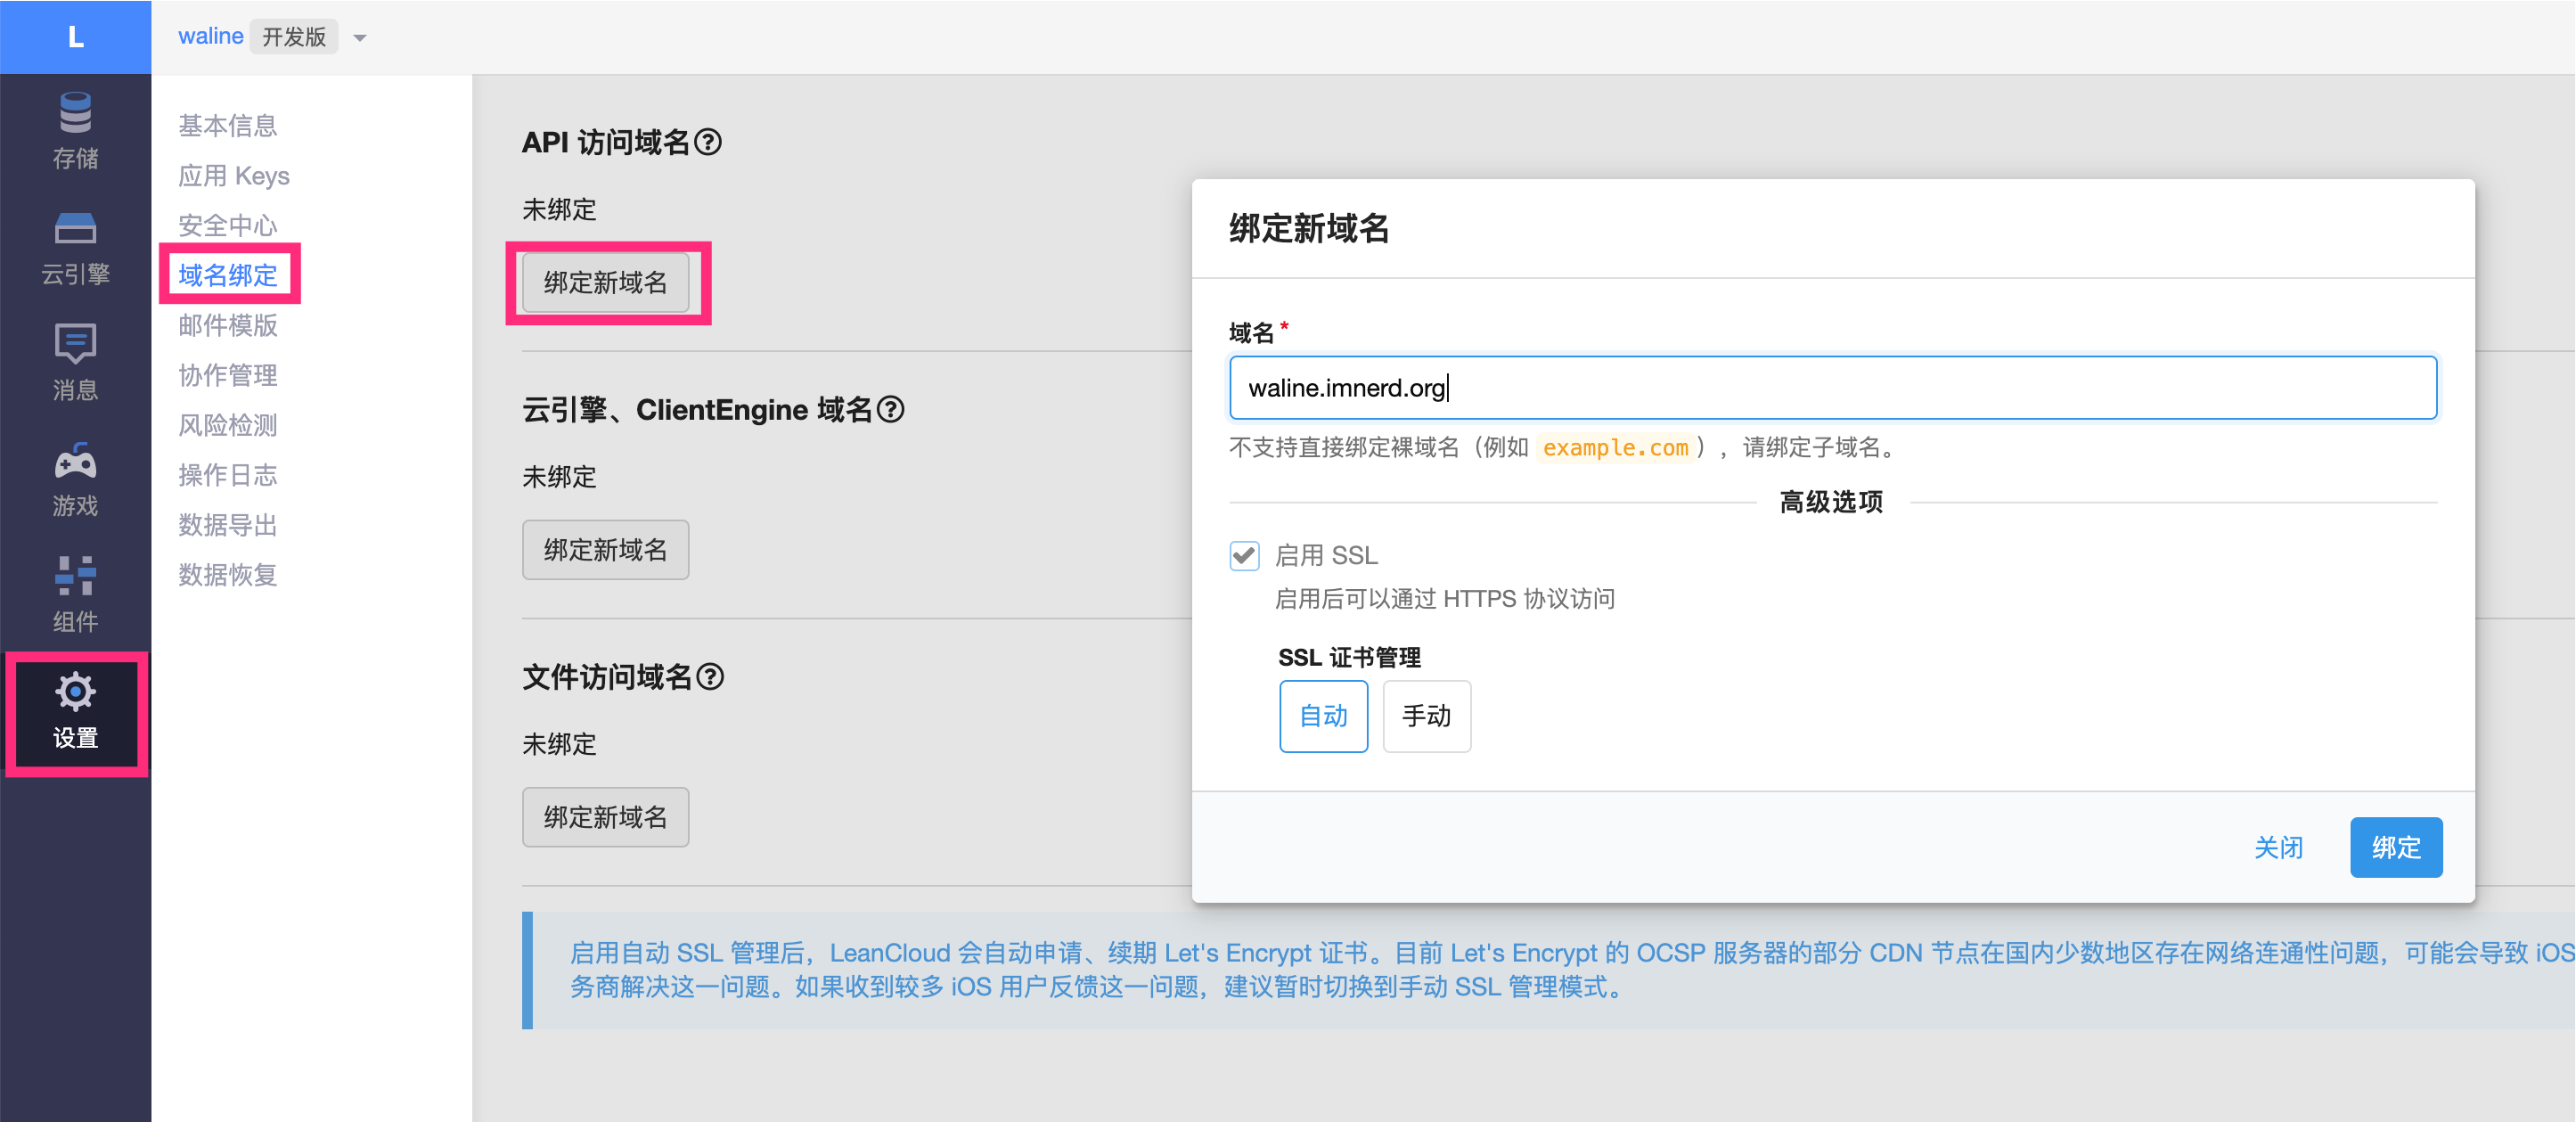
- 登录国内版并进入需要使用的应用
|
||
- 选择 `设置` > `域名绑定` > `API 访问域名` > `绑定新域名` > 输入域名 > `确定`。
|
||
- 按照页面上的提示按要求在 DNS 上完成 CNAME 解析。
|
||
- 购买独立 IP 并提交工单完成备案接入。(独立 IP 目前价格为 ¥ 50/个/月)
|
||
|
||
|
||
|
||
:::
|
||
|
||
### Vercel 部署 (服务端)
|
||
|
||
[](https://vercel.com/new/clone?repository-url=https%3A%2F%2Fgithub.com%2Fwalinejs%2Fwaline%2Ftree%2Fmain%2Fexample)
|
||
|
||
:::: steps
|
||
|
||
1. 点击上方按钮,跳转至 Vercel 进行 Server 端部署。
|
||
|
||
::: note
|
||
|
||
如果你未登录的话,Vercel 会让你注册或登录,请使用 GitHub 账户进行快捷登录。
|
||
|
||
:::
|
||
|
||
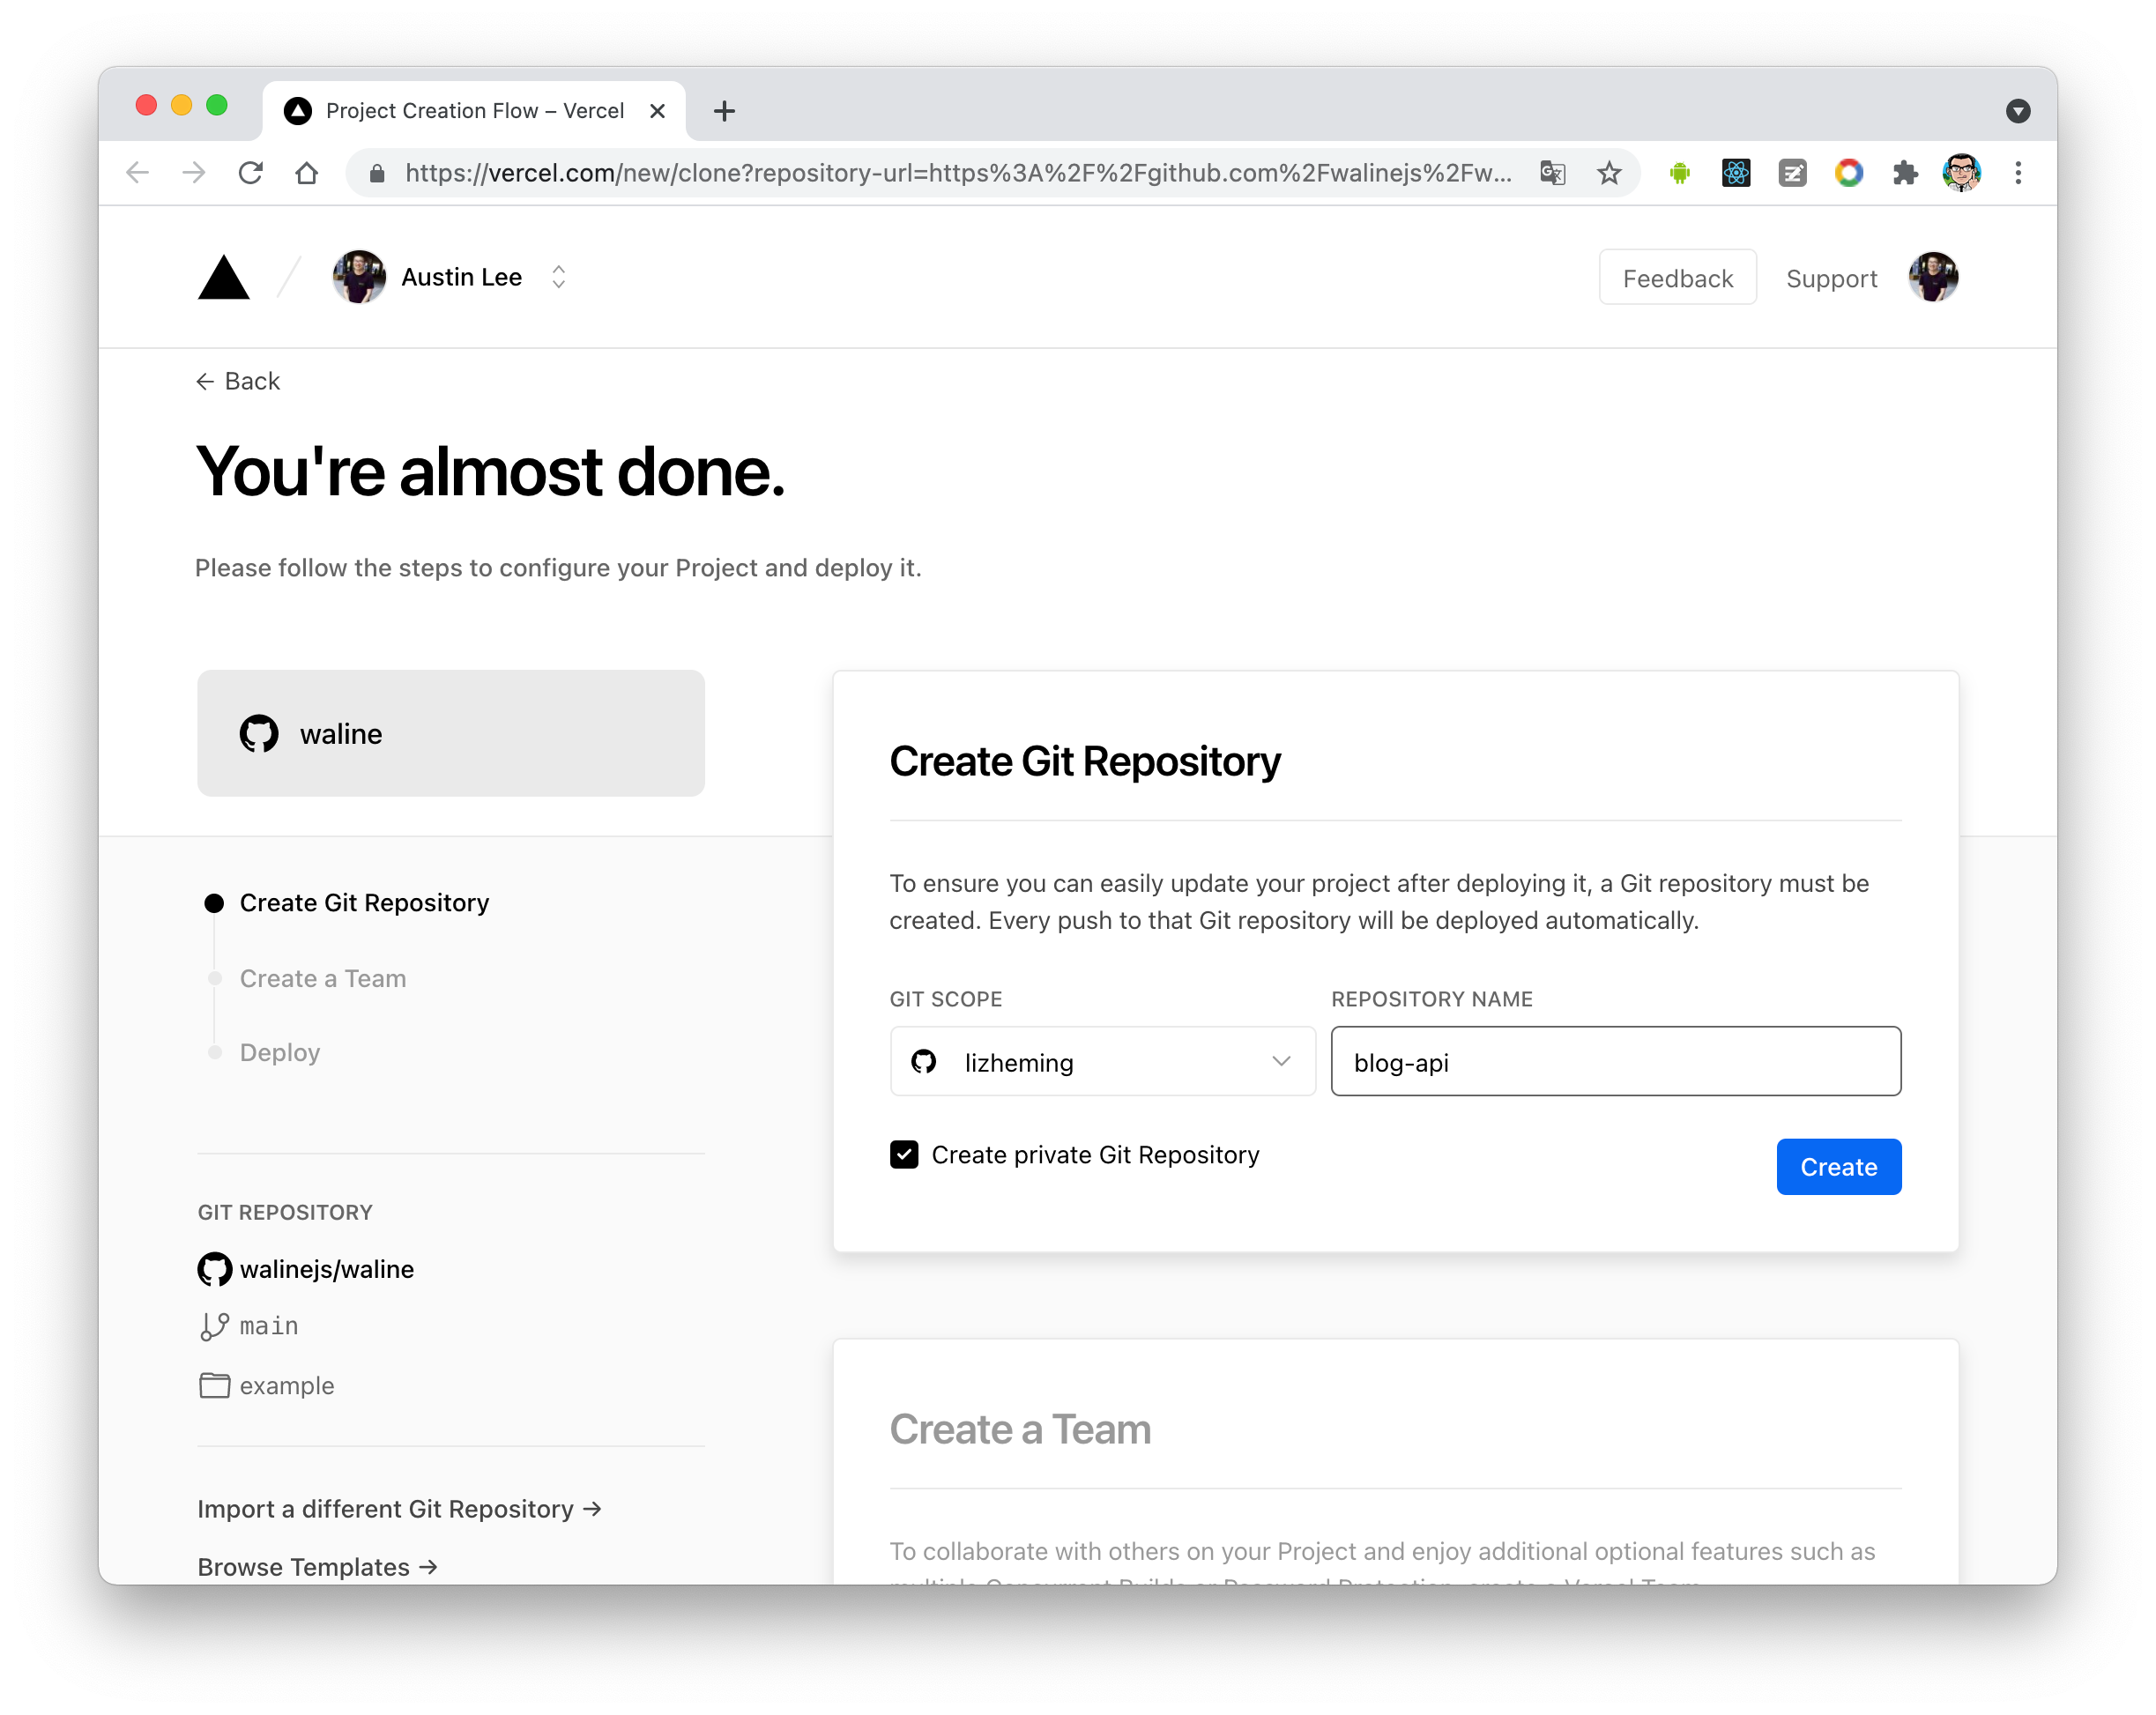
2. 输入一个你喜欢的 Vercel 项目名称并点击 `Create` 继续:
|
||
|
||
|
||
|
||
3. 此时 Vercel 会基于 Waline 模板帮助你新建并初始化仓库,仓库名为你之前输入的项目名。
|
||
|
||
|
||
|
||
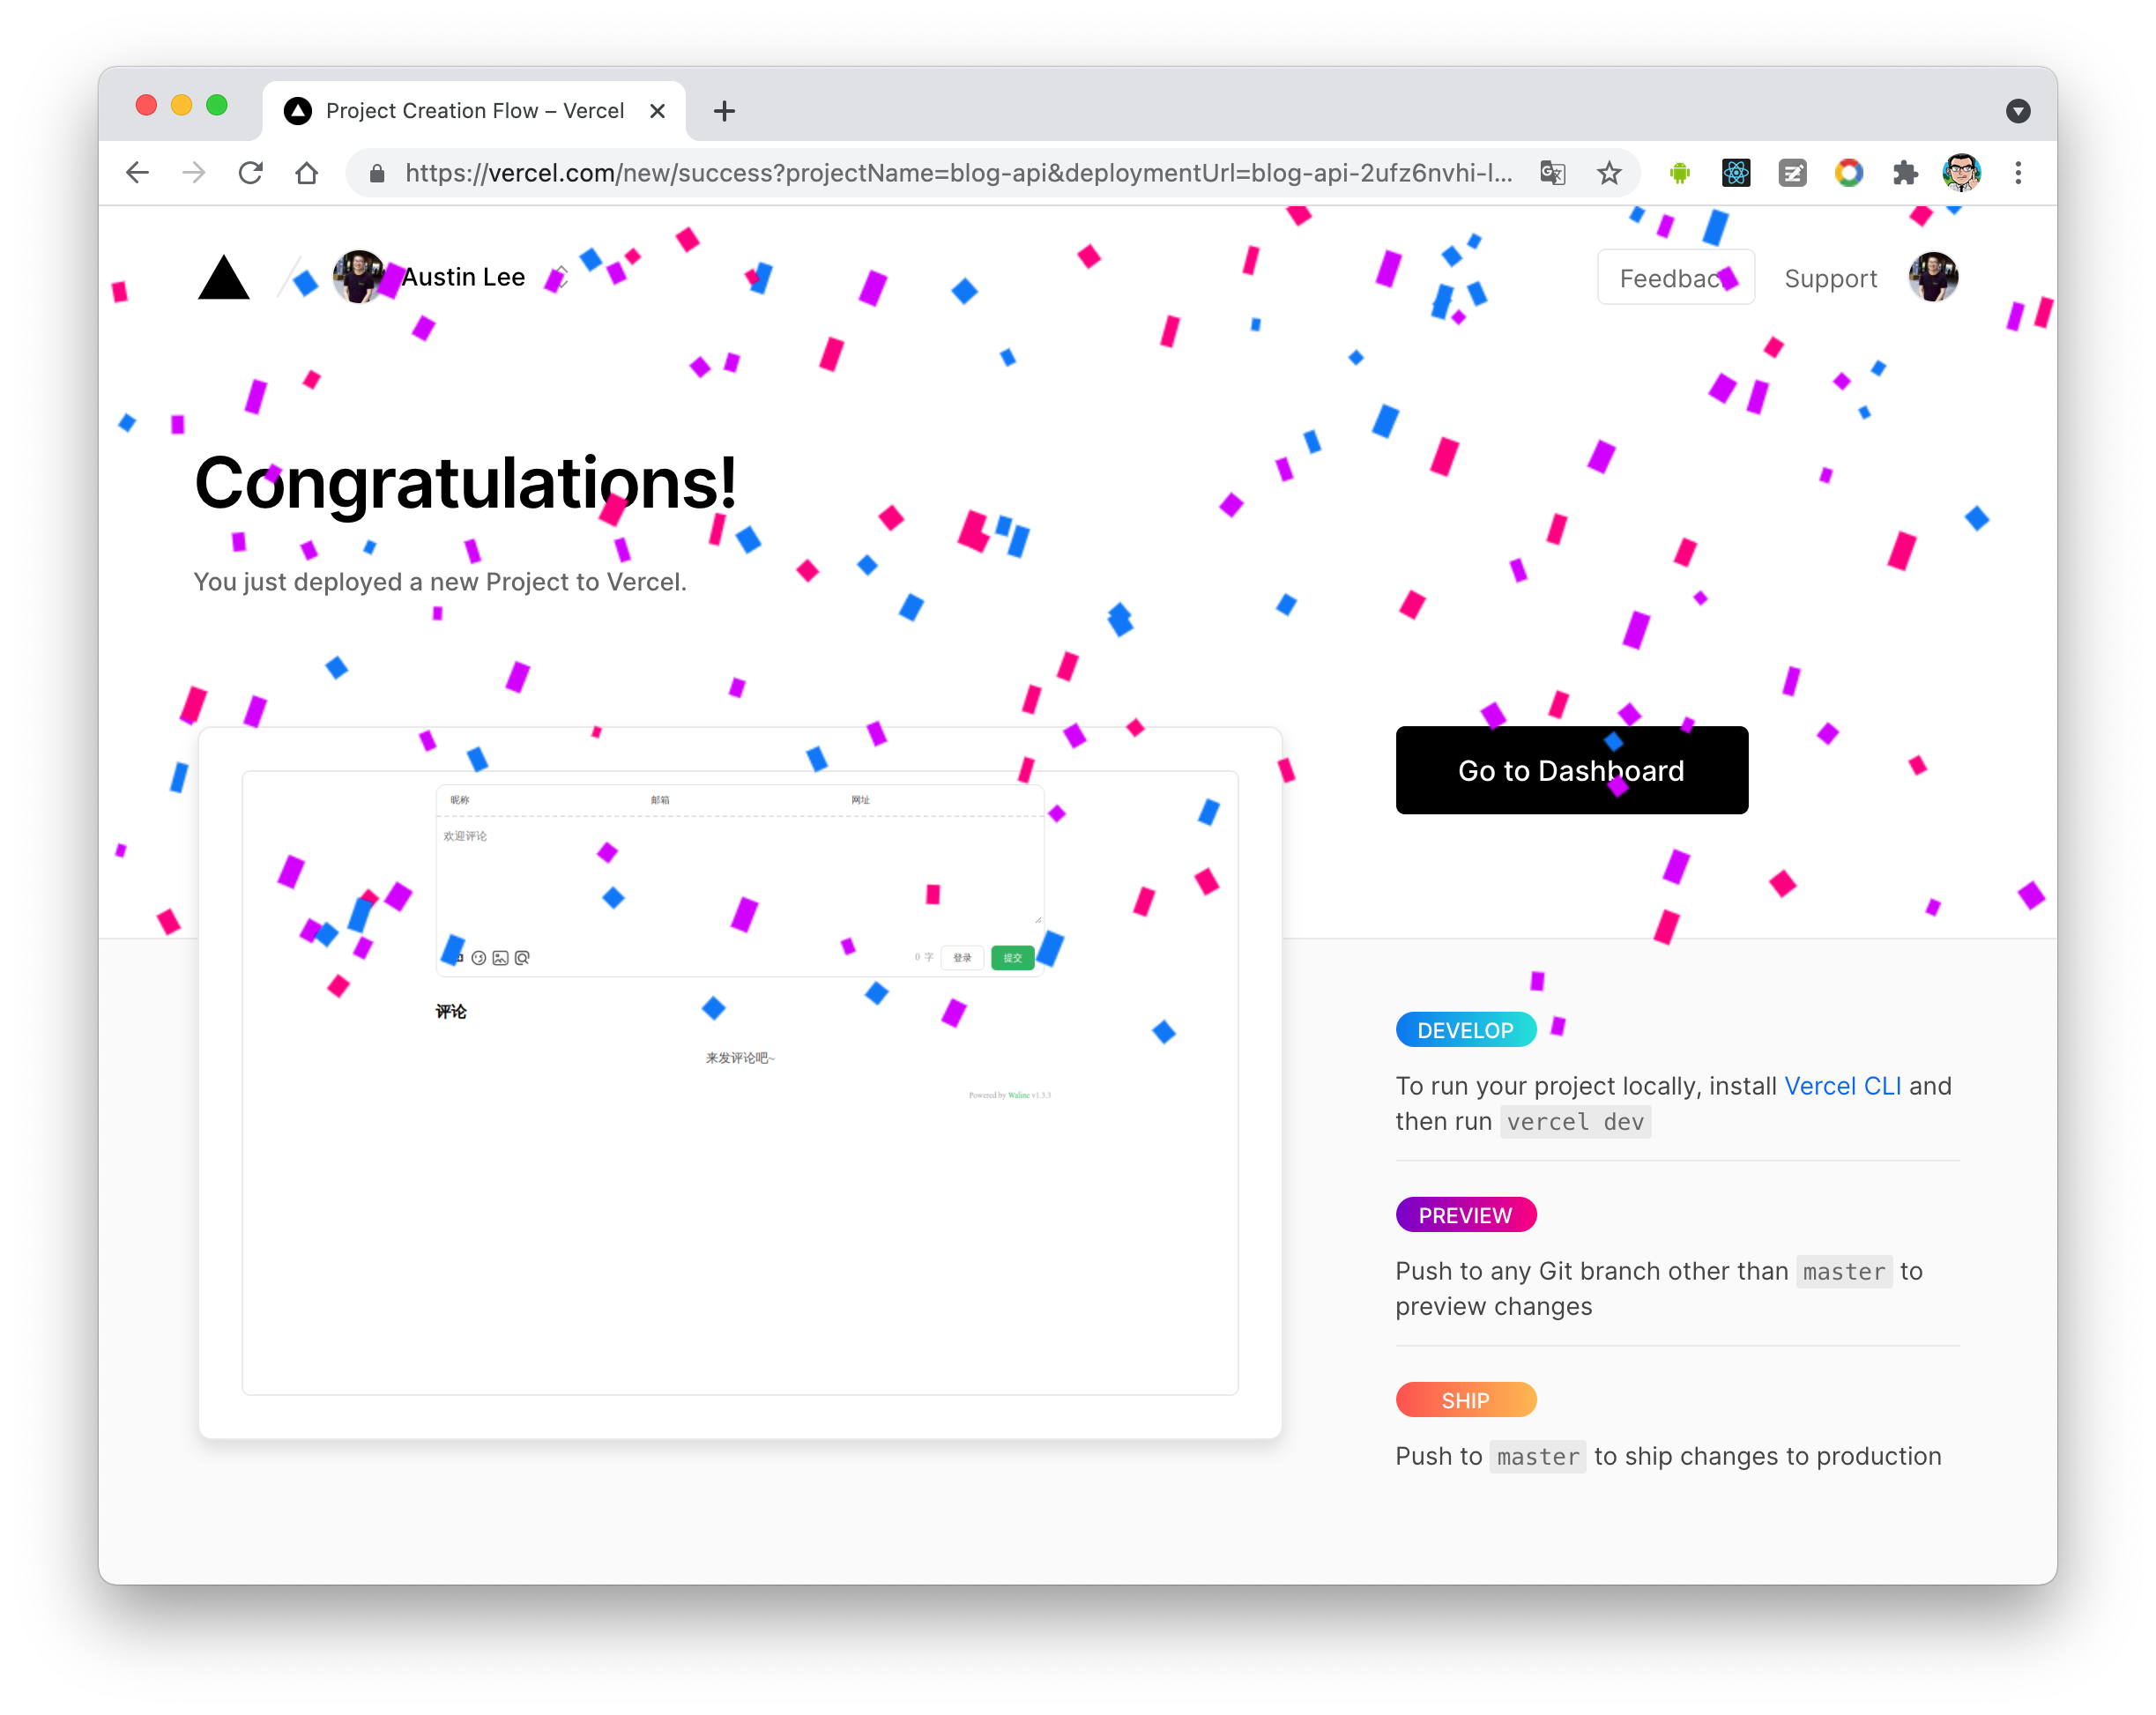
一两分钟后,满屏的烟花会庆祝你部署成功。此时点击 `Go to Dashboard` 可以跳转到应用的控制台。
|
||
|
||
|
||
|
||
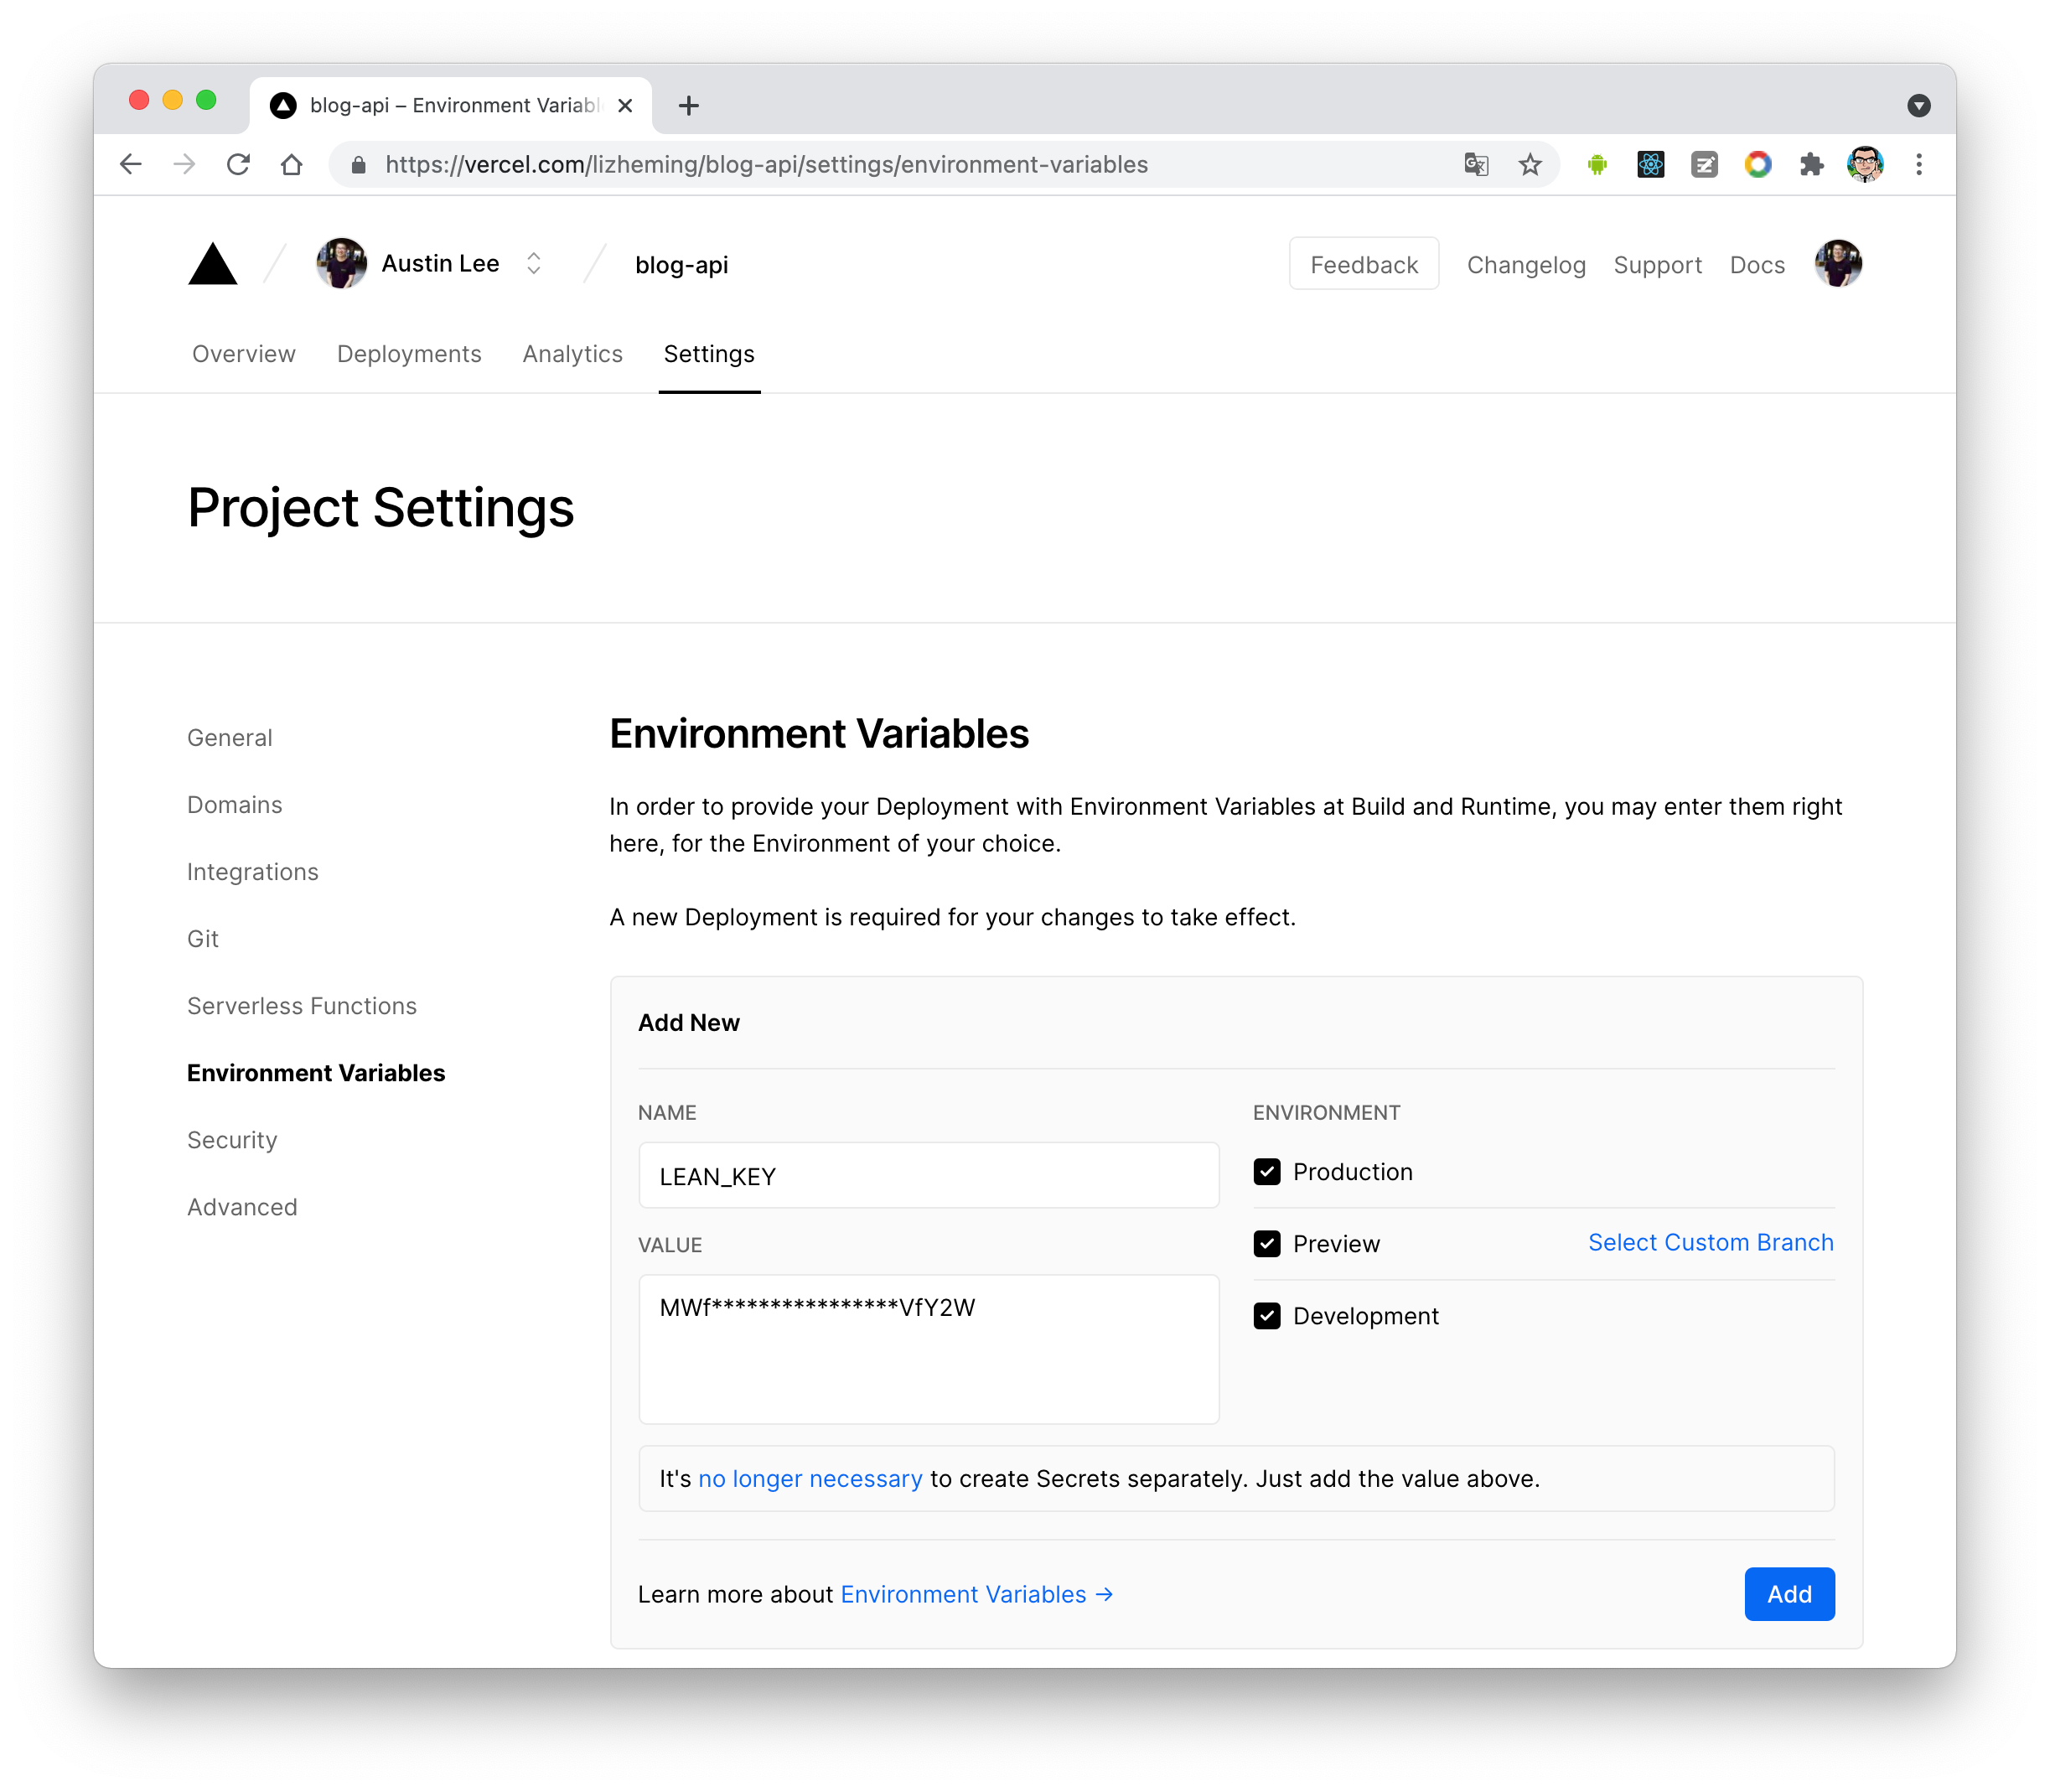
4. 点击顶部的 `Settings` - `Environment Variables` 进入环境变量配置页,
|
||
并配置三个环境变量 `LEAN_ID`, `LEAN_KEY` 和 `LEAN_MASTER_KEY` 。
|
||
它们的值分别对应上一步在 LeanCloud 中获得的 `APP ID`, `APP KEY`, `Master Key`。
|
||
|
||
|
||
|
||
::: note
|
||
|
||
如果你使用 LeanCloud 国内版,请额外配置 `LEAN_SERVER` 环境变量,值为你绑定好的域名。
|
||
|
||
:::
|
||
|
||
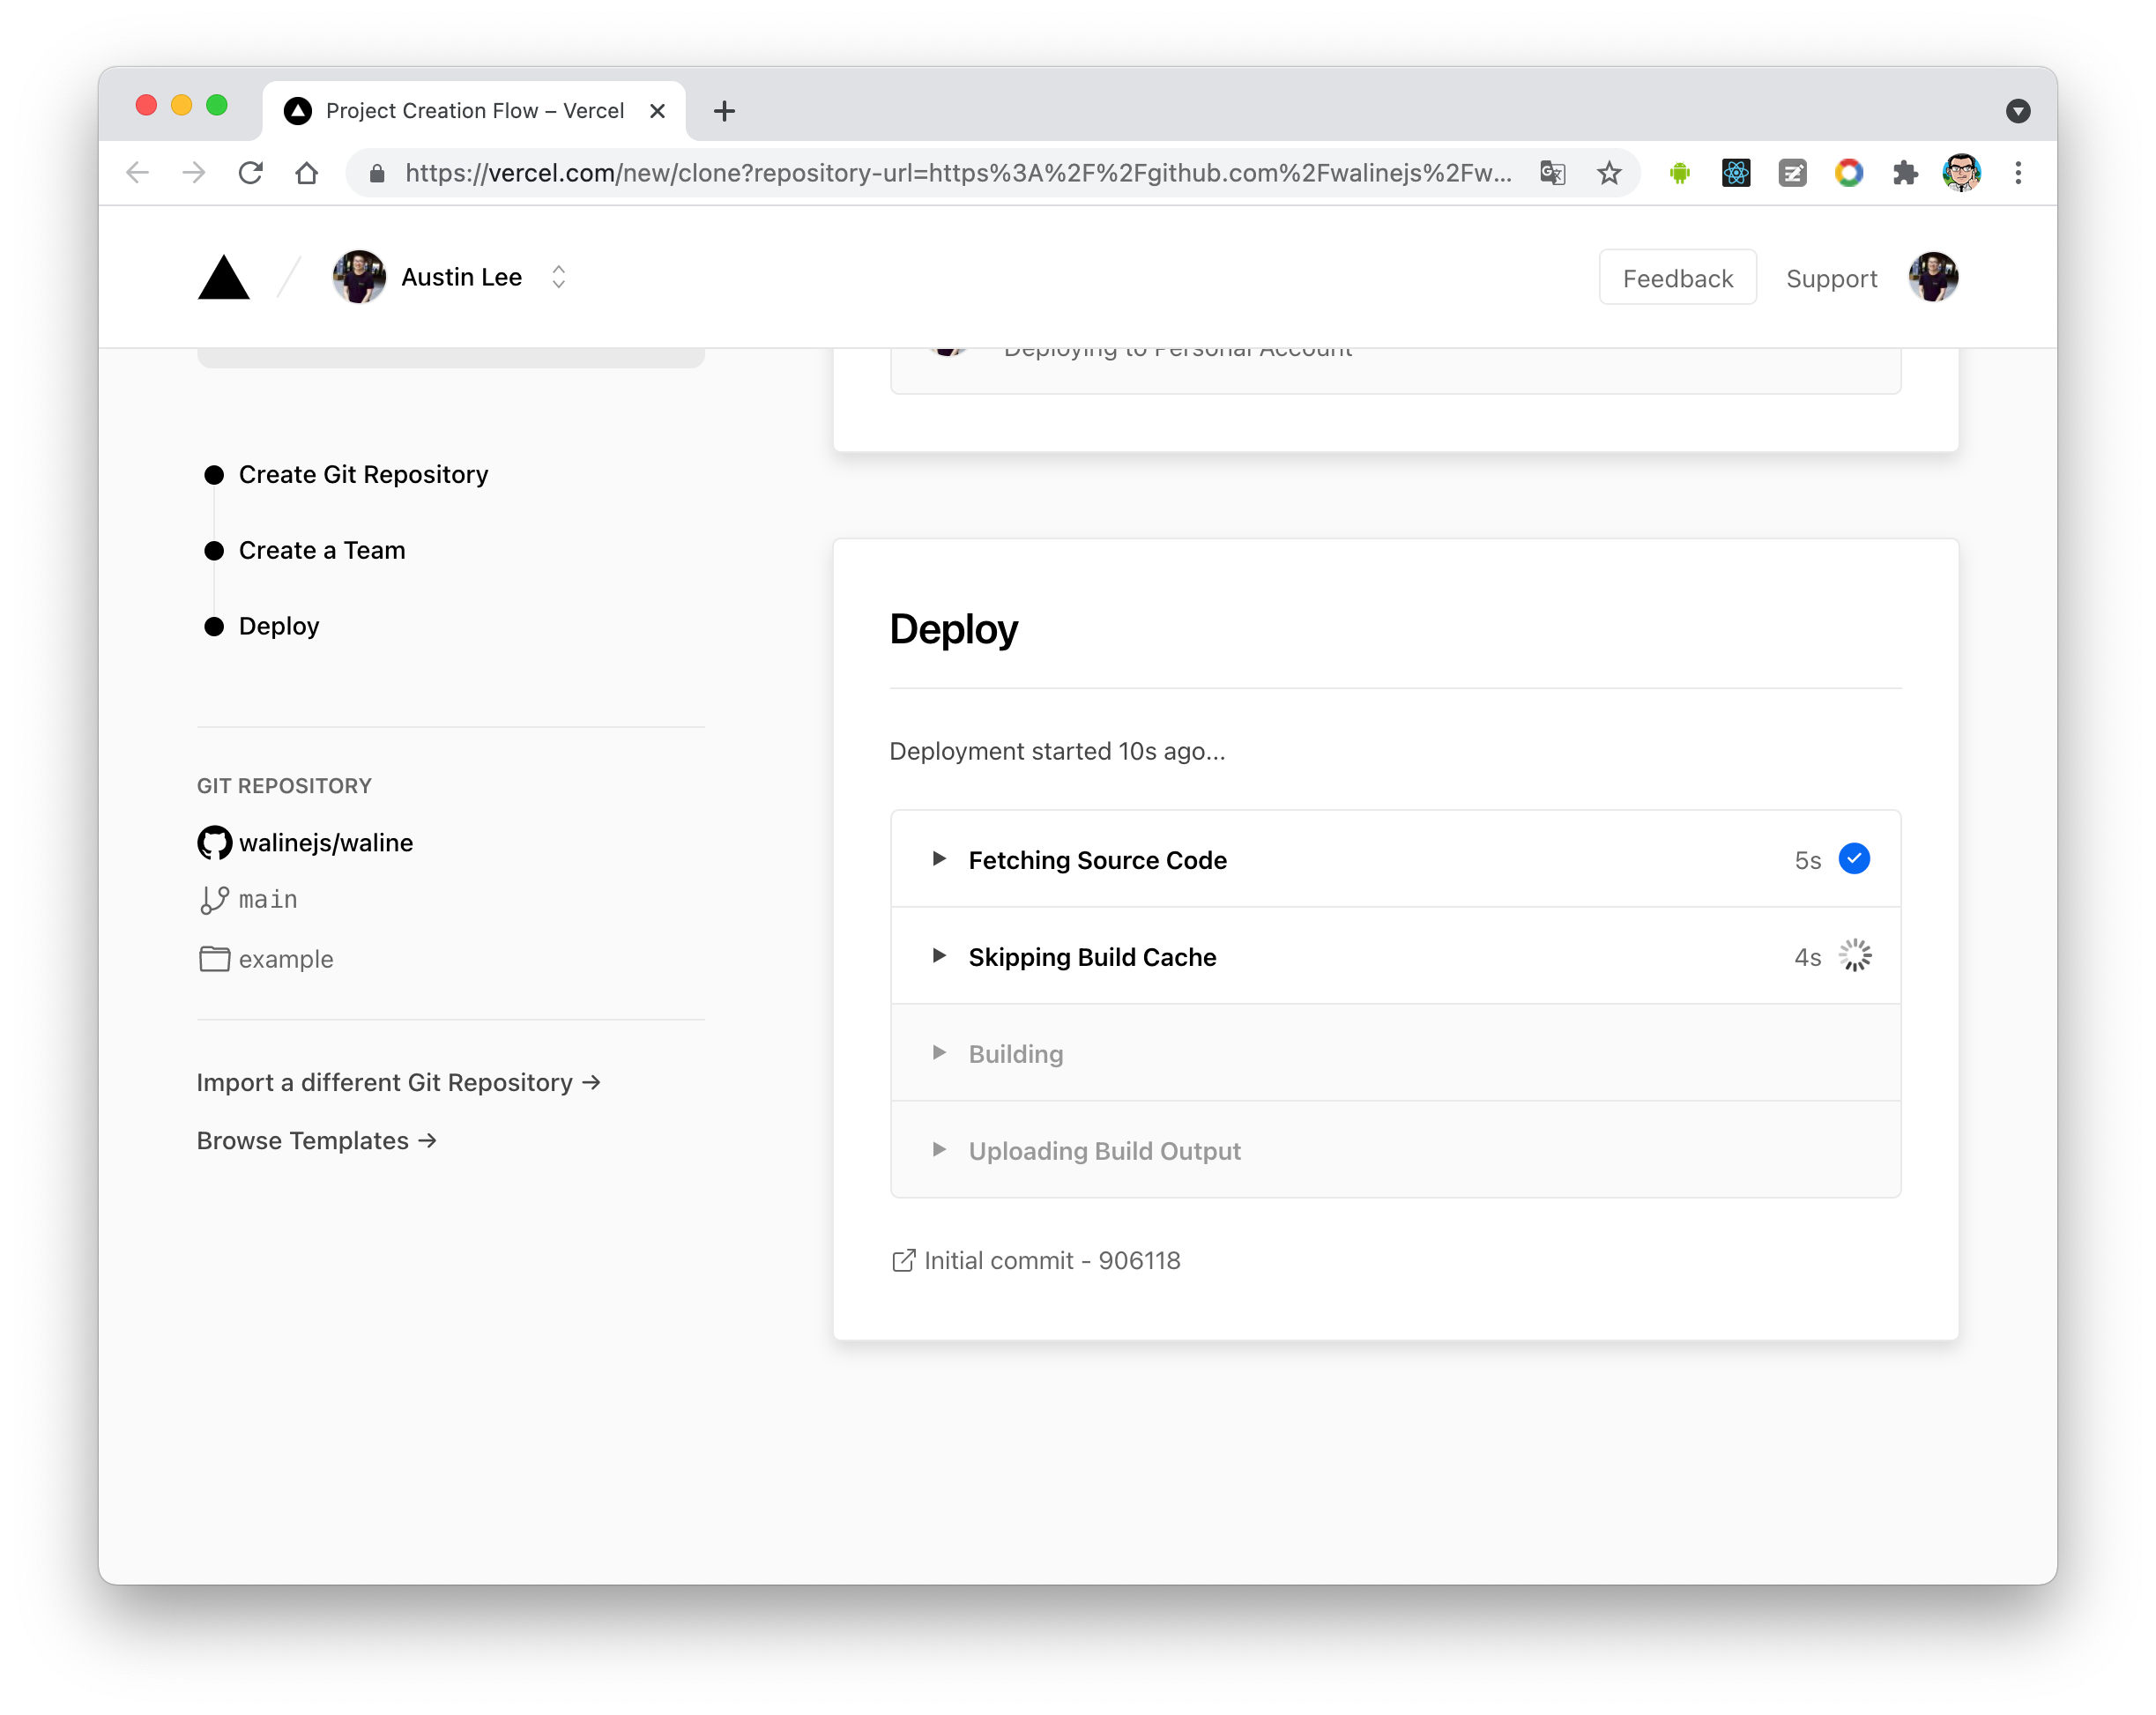
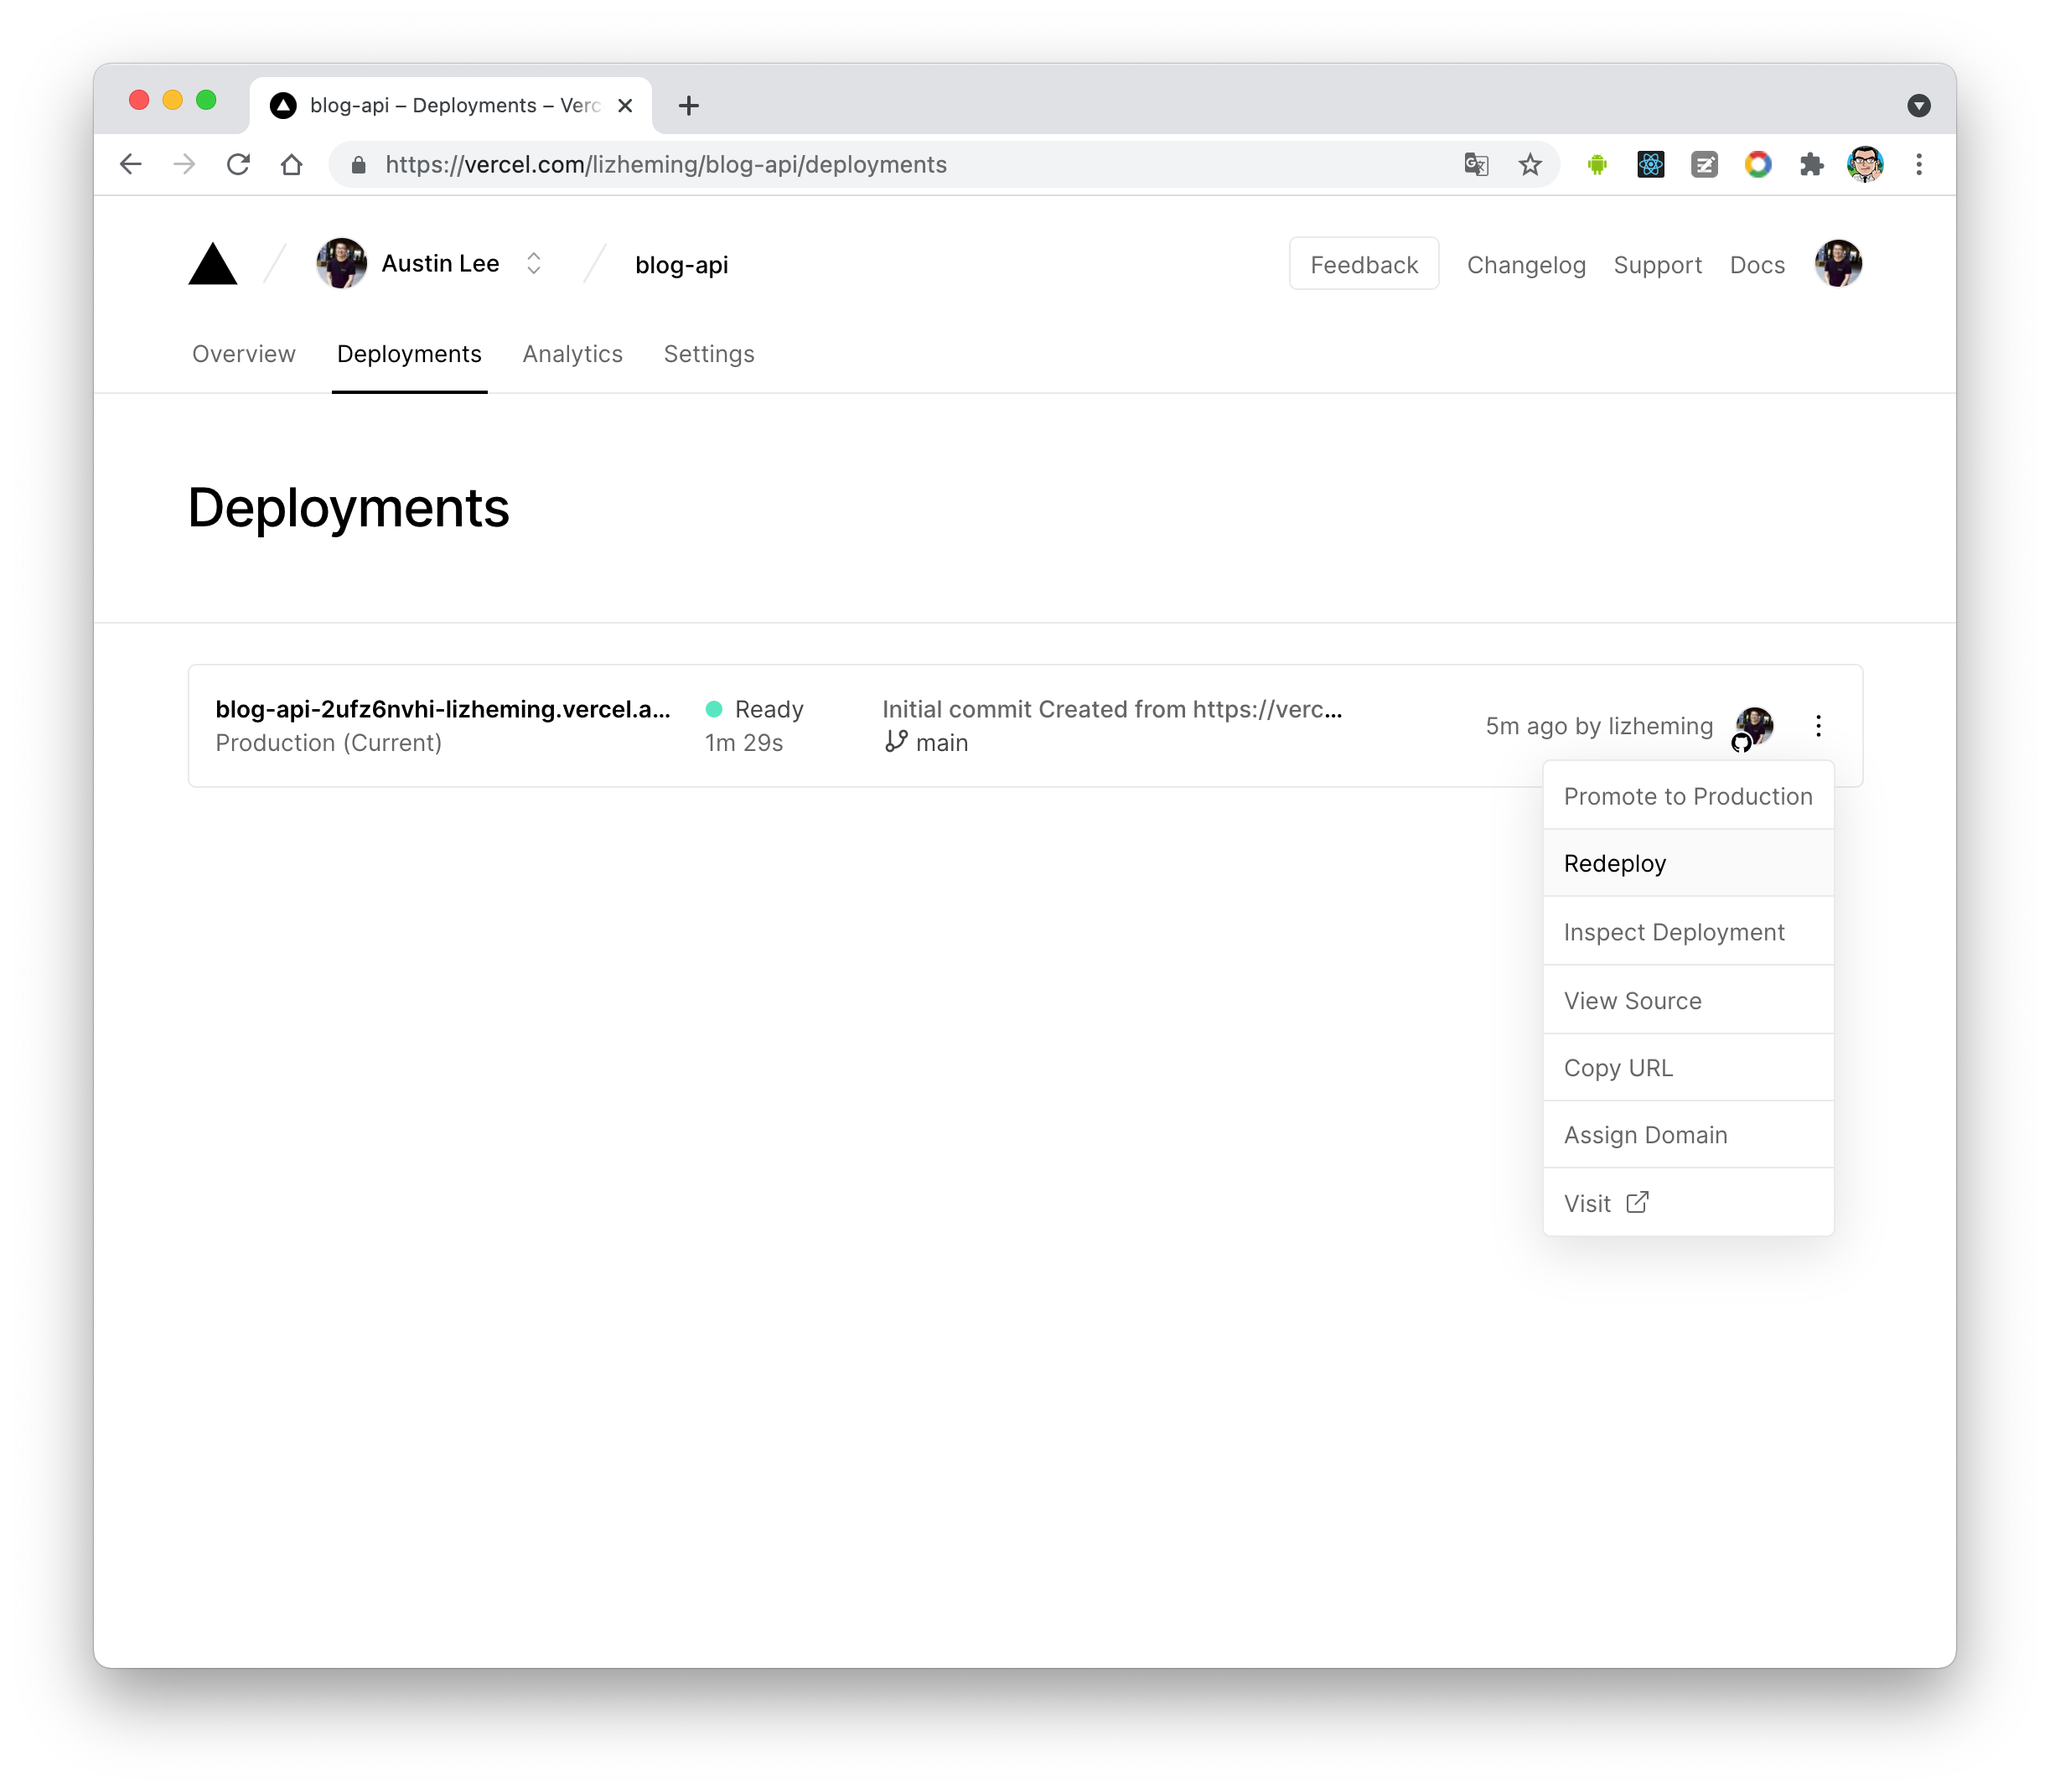
5. 环境变量配置完成之后点击顶部的 `Deployments` 点击顶部最新的一次部署右侧的 `Redeploy` 按钮进行重新部署。该步骤是为了让刚才设置的环境变量生效。
|
||
|
||
|
||
|
||
6. 此时会跳转到 `Overview` 界面开始部署,等待片刻后 `STATUS` 会变成 `Ready`。此时请点击 `Visit` ,即可跳转到部署好的网站地址,此地址即为你的服务端地址。
|
||
|
||
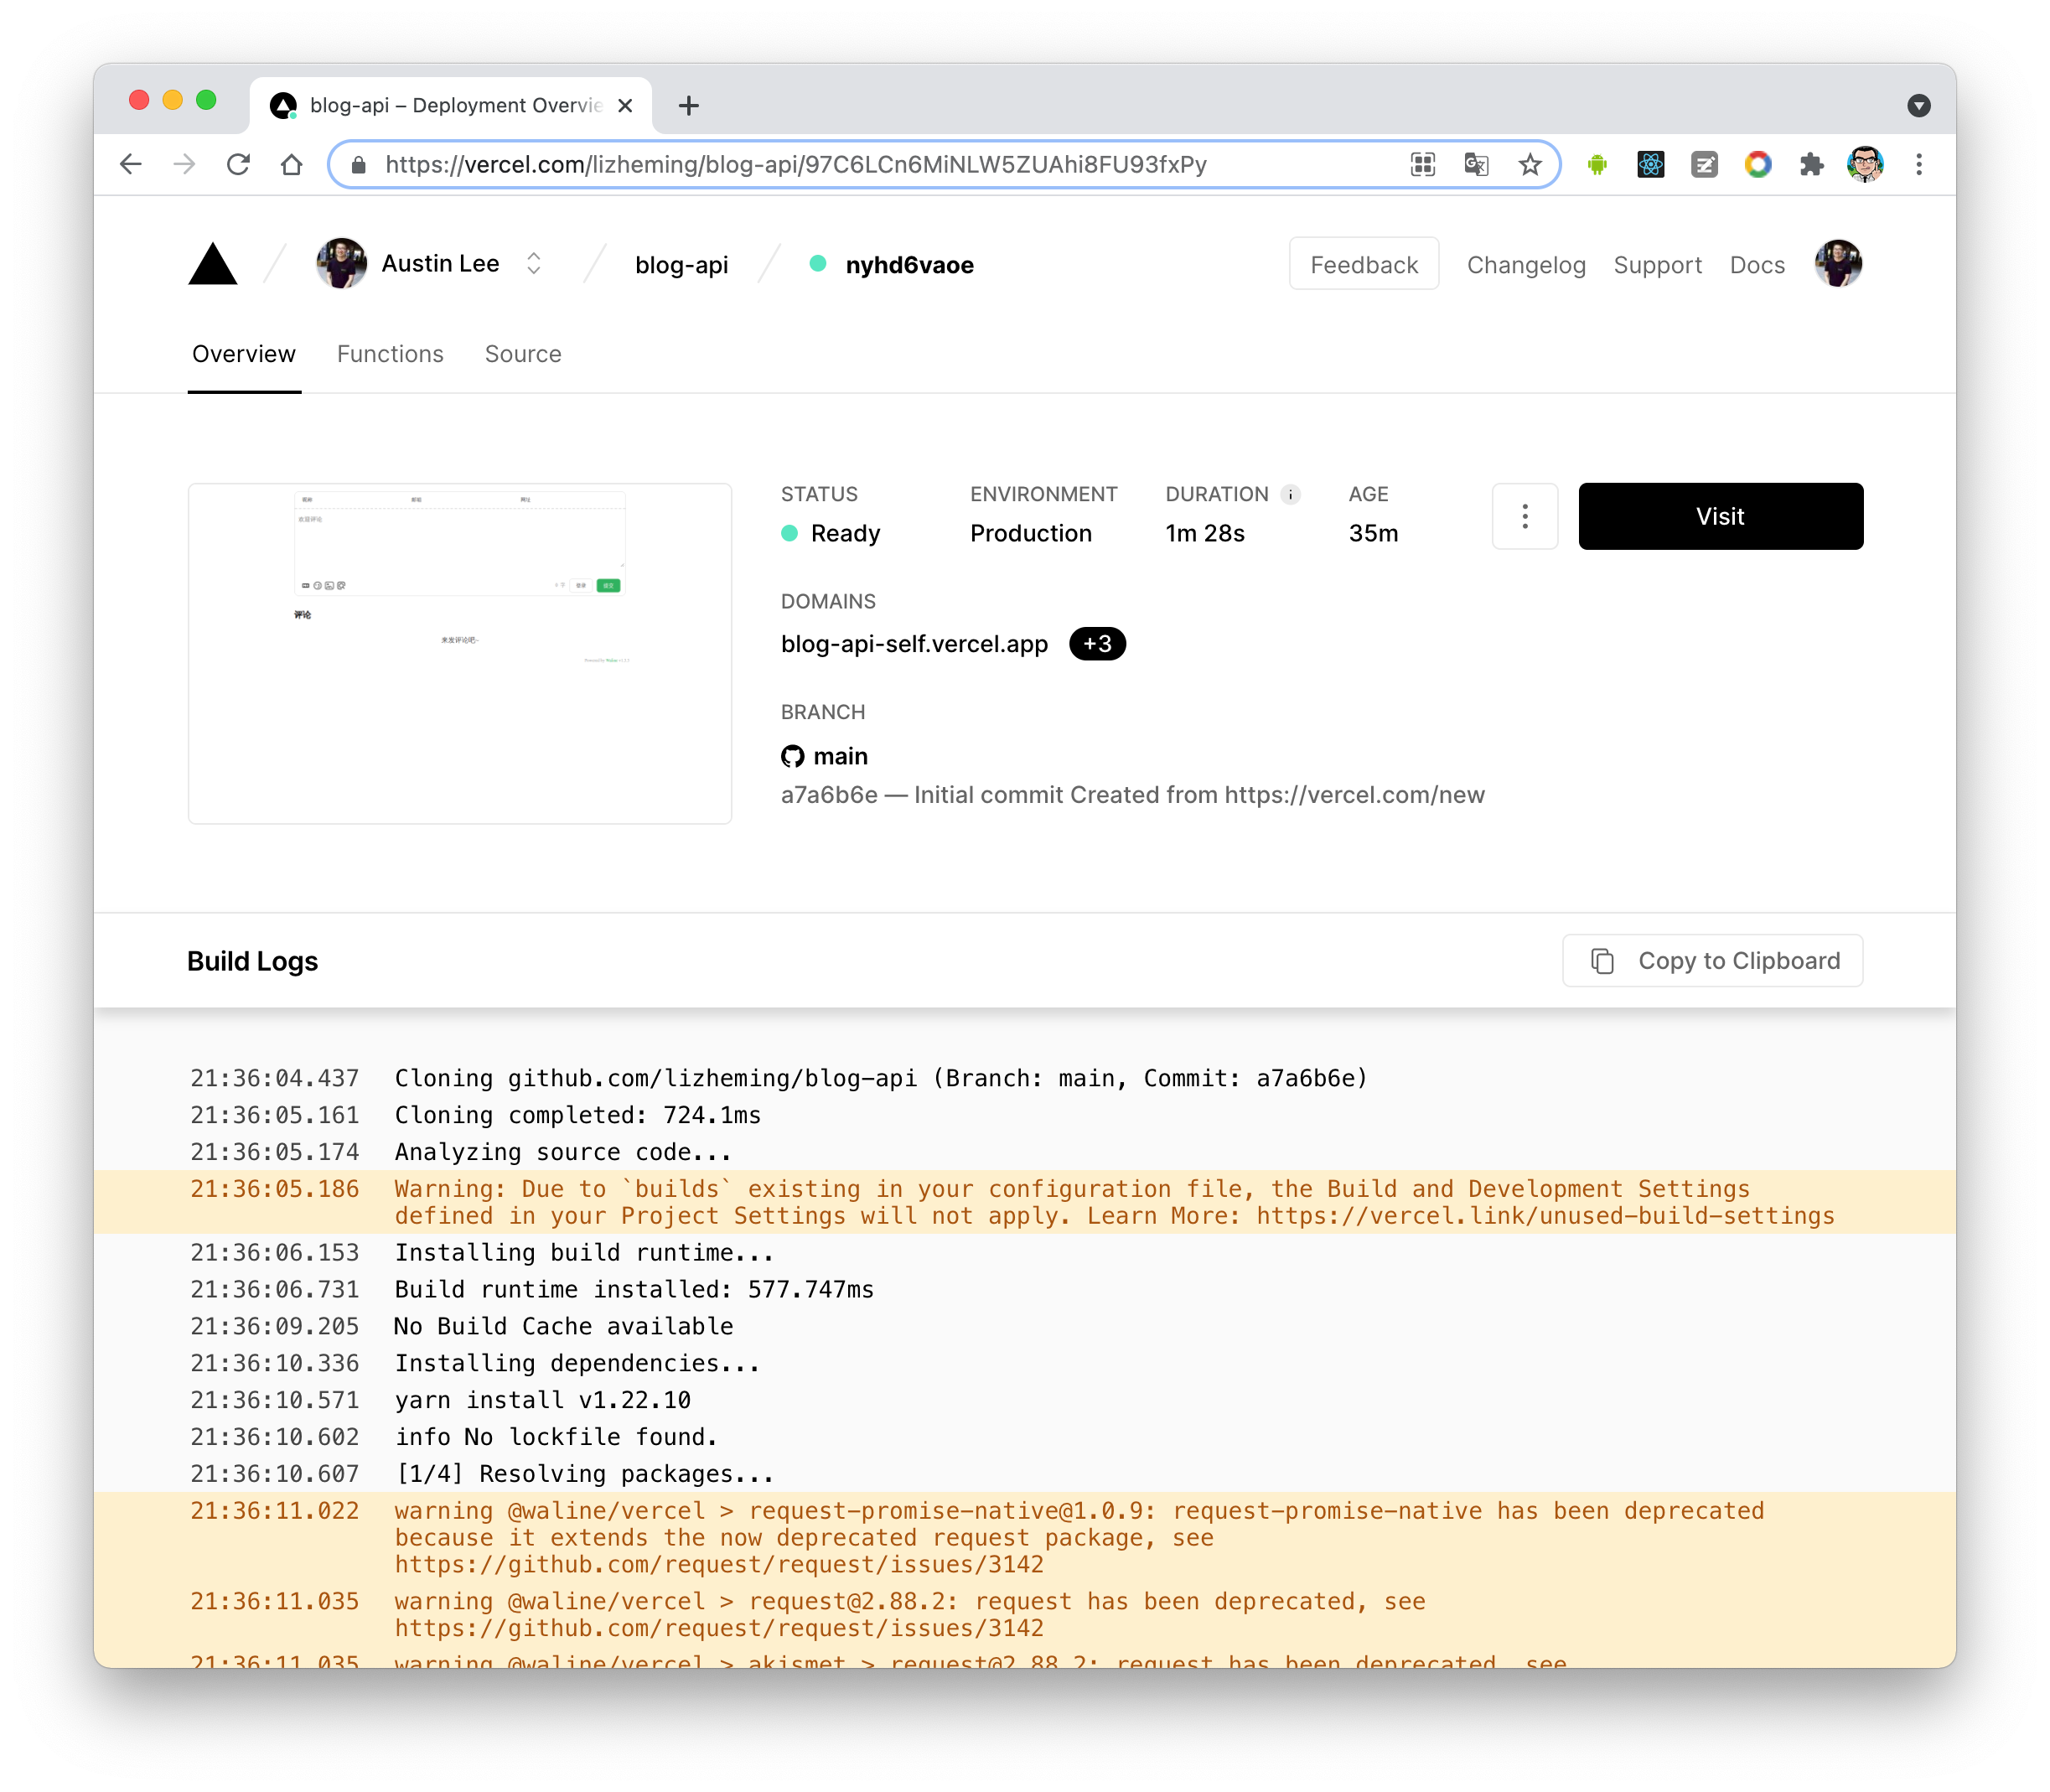
|
||
|
||
::::
|
||
|
||
### 绑定域名 (可选)
|
||
|
||
::: steps
|
||
|
||
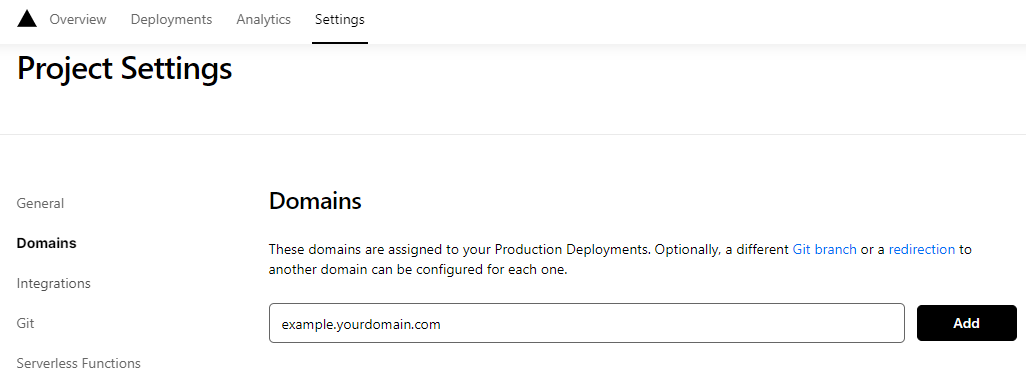
1. 点击顶部的 `Settings` - `Domains` 进入域名配置页
|
||
|
||
2. 输入需要绑定的域名并点击 `Add`
|
||
|
||
|
||
|
||
3. 在域名服务器商处添加新的 `CNAME` 解析记录
|
||
|
||
| Type | Name | Value |
|
||
| ----- | ------- | -------------------- |
|
||
| CNAME | example | cname.vercel-dns.com |
|
||
|
||
4. 等待生效,你可以通过自己的域名来访问了:tada:
|
||
|
||
- 评论系统:example.your-domain.com
|
||
- 评论管理:example.your-domain.com/ui
|
||
|
||

|
||
|
||
:::
|
||
|
||
### 客户端
|
||
|
||
#### 使用插件
|
||
|
||
在插件选项中设置 `provider: "Waline"`,同时设置服务端地址 `serverURL` 为上一步获取到的值。
|
||
|
||
此时,将 `<CommentService>` 组件放置在你网站中合适的位置 (通常是页面的底部),即可使用 Waline 评论功能。
|
||
|
||
::: tip
|
||
|
||
你也可以传入其他 Waline 支持的选项 (除了 `el`)。详情请见 [Waline 配置](https://ecosystem.vuejs.press/zh/plugins/blog/comment/waline/config.html)
|
||
|
||
:::
|
||
|
||
### 评论管理 (管理端)
|
||
|
||
::: steps
|
||
|
||
1. 部署完成后,请访问 `<serverURL>/ui/register` 进行注册。首个注册的人会被设定成管理员。
|
||
|
||
2. 管理员登陆后,即可看到评论管理界面。在这里可以修改、标记或删除评论。
|
||
|
||
3. 用户也可通过评论框注册账号,登陆后会跳转到自己的档案页。
|
||
|
||
:::
|